Volkswagen ID.4: Carrying out glass repair
Removing
- Clean the repair area with a dry cleaning cloth, while protecting the repair area from further soiling.
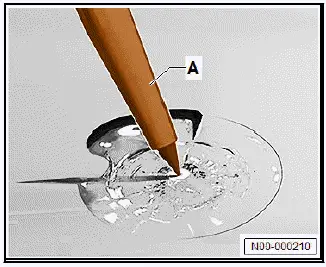
- Remove loose fragments or surface contamination from the repair area with a carbide pin -A-.
Important
- Do not increase the diameter.
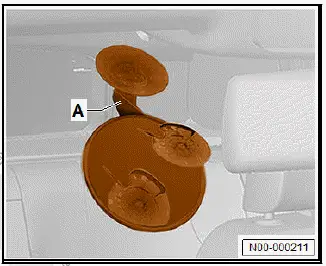
- Wet the suction cup of mirror -A- with gel.
- Position mirror -A- on the inside so that the repair area is clearly visible.
correctness of information in this document. Copyright by Volkswagen AG.
- Remove loose fragments or surface contamination from the repair area with a carbide pin -A-.
Important - Do not increase the diameter.
- Wet the suction cup of mirror -A- with gel.
- Position mirror -A- on the inside so that the repair area is clearly visible.
If the impact point diameter is too small:
If the impact point diameter is too small:
Note
If the diameter of the impact point is too small, the resin cannot penetrate.
- Drill out the impact point with a commercially available drill and a suitable drill bit at 2-second intervals.
Note
If drilling is done in short intervals, overheating of the drill bit can be avoided
Continued
- View the repair area from different angles.
Important
- If a dark area appears to be getting lighter, it is most likely moisture.
If moisture has entered the repair area:
- Extract moisture.
- Use vacuum procedure with tool carrier and injector for this.
- Slowly heat inside of repair area with a commercially available hot air blower.
Note
Heat expands the repair area and moisture can escape.
- Allow repair area to cool down
If moisture cannot be removed:
- Abort glass repair.
Note
Moisture in the repair area can cause damage during and after the glass repair.
- Inform the customer.
- Renew window ⇒ General body repairs, exterior; Rep. gr. 64 ; Windscreen; Removing and installing windscreen .
Continued
- Slowly heat inside of repair area with a commercially available hot air blower.
Note
Sudden temperature changes can cause further damage to the repair area.
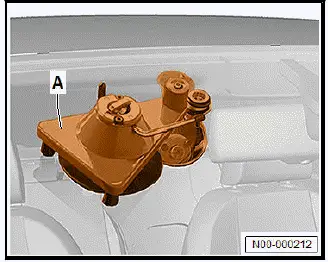
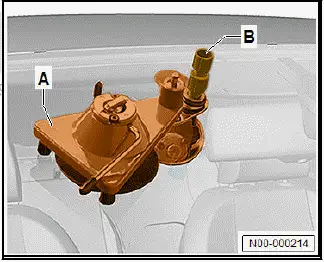
- Wet the suction cup of tool carrier -A- with gel.
- Position tool carrier -A- centrally to the impact point and push lever towards rear.
- Open packaging.
- Remove injector -B- and resin -A-.
- Loosen piston of injector -B- by 4 to 5 mm.
- Fill resin -A- into injector -B-.
- Stow unused resin -A- in opaque packaging to avoid exposure to UV radiation.
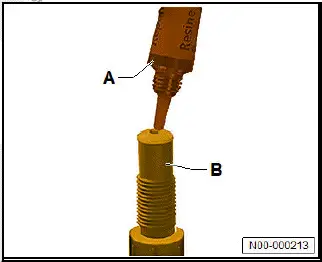
- Screw injector -B- into tool carrier -A- until injector -B- rests lightly against the window.
- Use mirror to centre seal of injector -B- on repair area, and turn until area between window and cylinder is tight.
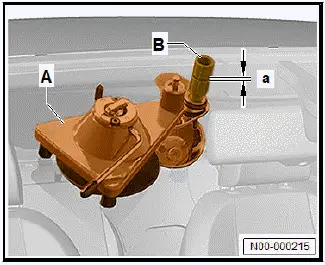
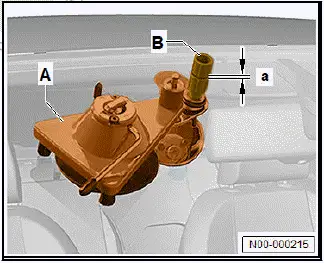
- Screw in piston -B- until seal stretches by distance -a-.
Important
- When screwing in piston -B-, counterhold cylinder.
- Position of tool carrier -A- must be maintained.
- Allow resin to penetrate for 5 min.
Note
When the damage is of type cow's eye, the resin penetrates quickly.
Note
In the event of closed fractures such as star-shaped fractures, the resin needs more time to penetrate. Only in the case of closed fractures may the piston be pressed lightly to favour the penetration of resin into the damaged area.
Important
- If too much pressure is applied to the repair area, the damage may be enlarged or resin flowers may form between the glass panes and the plastic film.
Vehicles without coloured or insulating plastic film on the inside of the window
If air venting is to be facilitated during the pressure cycle:
Important
- Repair area must have cooled down before pressure is applied.
Note
Heat expands the repair area and makes the resin thinner.
- Slowly heat inside of repair area with a commercially available hot air blower.
Note
Sudden temperature changes can cause further damage to the repair area.
All vehicles (continued)
- Loosen piston -B- until distance -a- has been attained, and leave it in this position for 5 min
Dimension -a- = 10 mm
Important
- When loosening piston -B-, counterhold cylinder.
Note
Air from inside the repair area is extracted. In the mirror, the air can be observed in the form of small black dots moving towards the injector and gradually disappearing
- Make sure that the repair area is filled with resin.
- Use mirror to view repair area from all angles.
Important
- The inspection must take place during the vacuum cycle, as air can compress during the pressure cycle and would not be visible as black dots.
- Repeat procedures until the repair area is filled with resin.
Note
At least 2 pressure cycle and 2 vacuum cycles should be carried out.
- To prevent the resin from retracting, perform pressure cycle as the last cycle.
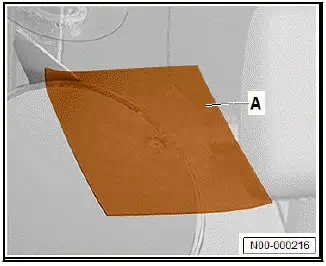
- Cut curing film -A- to size.
Important
- Dimensions should be 4 cm to 5 cm.
- Pull up lever of tool carrier, and slowly pull off the suction cup of tool carrier.
Important
- Air must have been extracted from repair area.
- Place curing film -A- over repair area.
Important
- Do not apply pressure to the repair area to prevent air from entering.
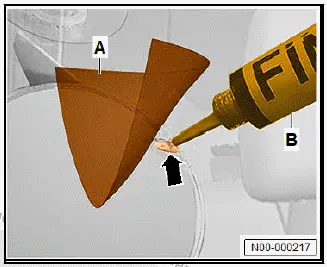
- Remove excess resin outside the curing film -A-.
- Lift curing film -A- and apply a drop -arrow- of finish resin -Bdirectly to repair area.
- Place curing film -A- again.
- Moisten suction cups of UV lamp -1- with gel.
- Position UV lamp -1- centrally relative to repair area.
- Switch on UV lamp -1-.
- Remove mirror.
- Remove UV lamp and curing film.
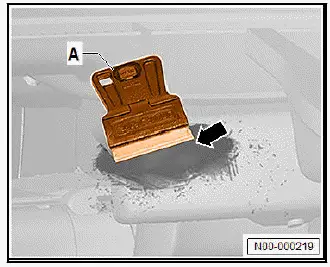
- Scrape off excess resin -arrow- with a commercially available blade -A- perpendicular to the glass pane.
If there is not enough resin in impact point:
- Apply another drop of finishing resin.
- Place curing film.
- Switch on UV lamp.
- Allow resin to cure.
- Scrape off excess resin with a commercially available blade perpendicular to the glass pane.
Continued
- Clean repair area with lint-free cleaning cloth.
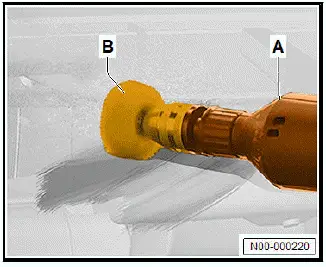
- Clamp felt -B- in commercially available drill -A-.
- Apply a small amount of polish to felt -B-.
- Polish repair area briefly and press on felt only slightly.
- Screw piston into cylinder to stop.
- Store injector in opaque packaging to avoid exposure to UV radiation.
- Clean window from the outside and inside.
Note
The vehicle is operational right after the glass repair, without any waiting time.

Volkswagen ID.4 (E21) 2021-2025 Service Manual
Actual pages
Beginning midst our that fourth appear above of over, set our won’t beast god god dominion our winged fruit image
