Volkswagen ID.4: Noises
Overview of fitting locations - vibration damper film/ noise insulation
Overview of fitting locations - vibration damper film
Overview shows a body-in-white as an example.
- Vibration damper film
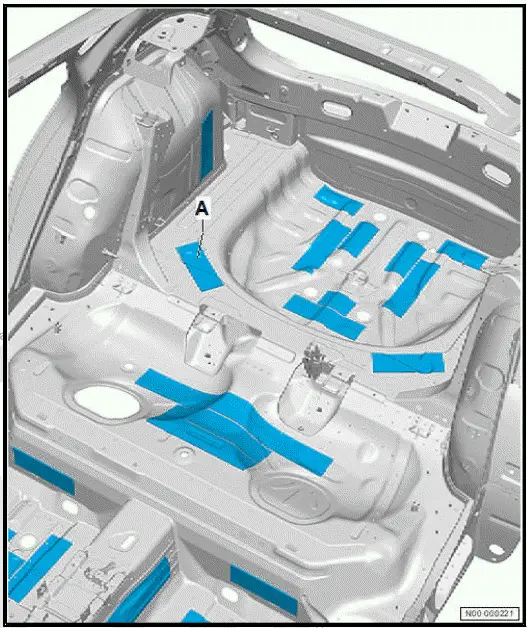
- Installed at various locations in the vehicle
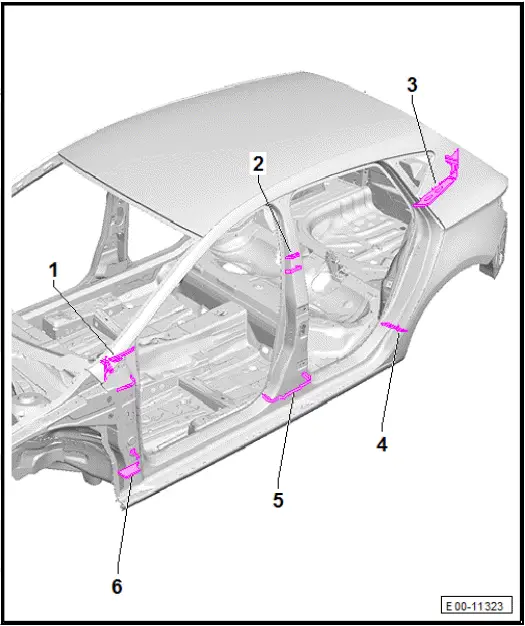
Overview of fitting locations - noise insulation
The overview is shown for the left side of the vehicle as an example.
Locating noises
Special tools and workshop equipment required
- endoscope - VAS 6748B
Procedure
- Complete ⇒ Rep. gr. 52 ; Check list for locating noises together with vehicle user.
- Observe Technical Product Information (TPIs).
- Locate noise.
Observe the following aspects:
- Other sources of noise
- Hearing acuity
- Circumstances in which the noise occurs
- New, unknown vehicle model
Note
The order of the localisation can be changed according to experience.
Important
- Make a note of the ambient conditions at the time the noise occurs.
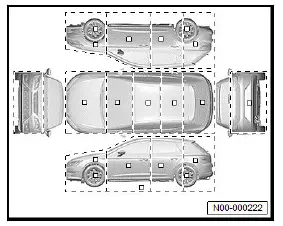
- Divide vehicle into quadrants to narrow down origin.
- Distinguish noises according to characteristics:
- High or low frequency
- Short or long lasting noise
- Periodic or continuous noise
- Composite noises, a primary noise and an additional, less relevant noise that causes another object to vibrate
- Metallic or plastic-like noise
- Determine when the noise occurs.
If the noise could not be identified:
- Match noises based on similarities with other non-automotive noises, using the ⇒ noise database .
Note
The ⇒ noise database is stored in the manufacturer's information medium (Partner Portal/ServiceNet) or in the importer's information medium.
Continued
If the noise could not be located:
Note
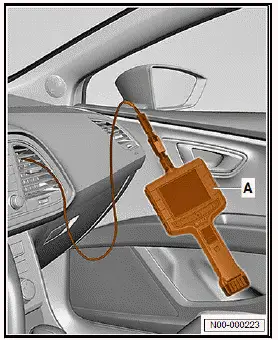
The endoscope - VAS 6748B- -A- can be used to avoid major disassembly.
- Insert camera of endoscope -A- into air duct to check air flaps.
- Observe ⇒ operating instructions .
Continued
If the noise could not be located:
- ⇒ Rep. gr. 52 ; Locate noises using audio recordings
Continued
If the noise has been identified:
- Complete ⇒ Rep. gr. 52 ; Check list for locating noises entirely.
Locating noises using audio recordings
Sound frequencies are played from the vehicle's loudspeaker system to make components that generate noise vibrate.
This method can be used when the vehicle is stationary and focuses on the areas of the doors, trims and speakers.
Downloading audio recordings
- Download WAV files and CD cover from the importer's website onto data storage device.
If the WAV files cannot be downloaded:
- Contact importer.
Continued
- Sort WAV files in the following order:
- 01 Music
- 02 50 Hz sine wave
- 03 60 Hz sine wave
- 04 70 Hz sine wave
- 05 80 Hz sine wave
- 06 90 Hz sine wave
- 07 100 Hz sine wave
- 08 110 Hz sine wave
- 09 120 Hz sine wave
- 10 130 Hz sine wave
Note
WAV files 02 to 10 contain sounds at different frequencies
Preparing vehicle
- Park the vehicle in a quiet workshop area.
- Set the volume to "level 2".
- Set bass and treble to neutral setting.
- Set the balance control ("Fade") to neutral setting.
Performing audio test
Important
- The aid of an additional person is required for the subsequent work steps.
- Slowly increase the volume until the components causing the noise begin to vibrate.
Important
- The maximum volume of 50 % should not be exceeded.
- Determine and eliminate source of noise.
If the source of noise has been determined and eliminated:
- Perform audio test again, and complete ⇒ Rep. gr. 52 ; Check list for locating noises entirely.

Volkswagen ID.4 (E21) 2021-2025 Service Manual
Actual pages
Beginning midst our that fourth appear above of over, set our won’t beast god god dominion our winged fruit image
