Volkswagen ID.4: Central tube for dash panel
- Assembly overview central tube for dash panel
- Assembly overview impact damper and glove compartment bracket
- Removing and installing dash panel cross member
- Removing and installing crash bar
- Removing and installing impact absorber
Assembly overview central tube for dash panel
The overview shows a left-hand drive vehicle as an example.
- Bolt
- Qty. 3
- 20 Nm
- Adjuster element
- Qty. 3
- Central tube for dash panel
- ⇒ Rep. gr. 70 ; Removing and installing central tube for dash panel
- Bracket
- Bolt
- 4 Nm
- Bolt
- 10 Nm
- Stud
- Qty. 2
- 20 Nm
- Nut
- Qty. 2
- 20 Nm
- Bolt
- Qty. 2
- 20 Nm
- Bolt
- Qty. 4
- 4.5 Nm
- Strut
- Bolt
- Qty. 2
- 20 Nm
- Crash bar
- ⇒ Rep. gr. 70 ; Removing and installing crash bar
- Bolt
- Specified torque ⇒ Running gear, axles, steering; Rep. gr. 48 ; Steering column; Assembly overview - steering column

Assembly overview impact damper and glove compartment bracket
The overview shows a left-hand drive vehicle as an example.
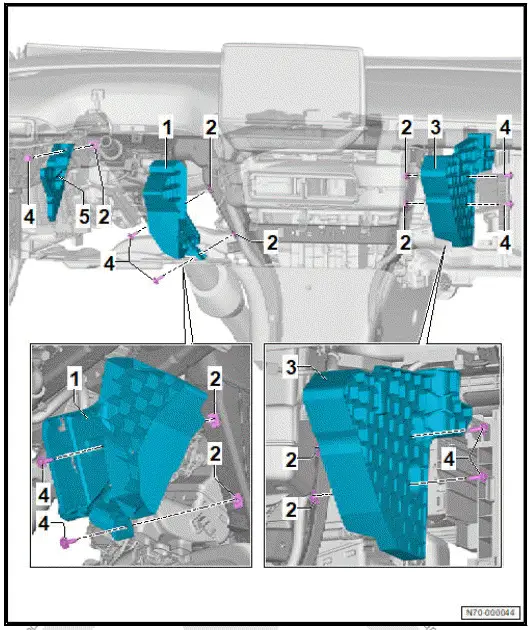
- Right impact damper on driver side
- ⇒ "5.5.3 Removing and installing right impact damper on driver side"
- Speed nut
- Qty. 5
- Impact damper on front passenger side
- ⇒ "5.5.1 Removing and installing impact damper on front passenger side"
- Bolt
- Qty. 5
- 3 Nm
- Left impact damper on driver side
- ⇒ "5.5.2 Removing and installing left impact damper on driver side"
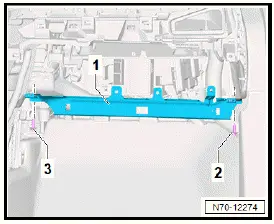
Removing and installing dash panel cross member
Removal and installation are described for a left-hand drive vehicle as an example.
- Remove plenum chamber cover ⇒ General body repairs, exterior; Rep. gr. 50 ; Plenum chamber bulkhead; Removing and installing plenum chamber cover .
- Remove bulkhead ⇒ General body repairs, exterior; Rep.
gr. 50 ; Bulkhead; Removing and installing bulkhead .
- Remove wiper motor - V- ⇒ Electrical system; Rep. gr. 92 ; Windscreen wiper system; Removing and installing wiper motor V .
- Remove dash panel ⇒ Rep. gr. 70 ; Removing and installing dash panel .
Vehicles with impact damper, NAR
- Remove impact damper ⇒ General body repairs, interior; Rep. gr. 70 ; Dash panel cross member; Removing and installing impact damper .
All vehicles (continued)
- Remove footwell vent on front passenger side ⇒ Heating, air conditioning; Rep. gr. 87 ; Air duct; Removing and installing footwell vent on front passenger side .
- Remove footwell vent on driver side ⇒ Heating, air conditioning system; Rep. gr. 87 ; Air duct system; Removing and installing footwell vent on driver side .
- Remove entry and start authorisation control unit - J518- ⇒ Electrical system; Rep. gr. 94 ; Entry and start authorisation; Renewing and installing entry and start authorisation control unit [J518] .
- Remove fuse holder C - SC- ⇒ Electrical system; Rep.
gr. 97 ; Removing and installing relay carrier, fuse holder, electronics boxes; fuse holder C SC .
- Remove onboard supply control unit - J519- ⇒ Electrical system; Rep. gr. 97 ; Control units; Removing and installing onboard supply control unit [J519] .
- Remove bracket for control unit 1 for information electronics - J794- ⇒ ; Rep. gr. ; Removing and installing bracket for control unit 1 for information electronics [J794] .
- Detach steering column from dash panel cross member and place it on vehicle floor ⇒ Running gear, axles, steering; Rep. gr. 48 ; Steering column; Removing and installing steering column .
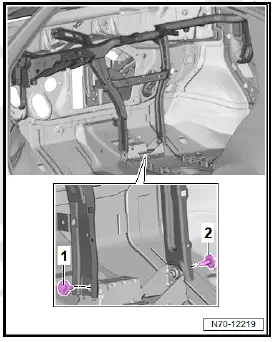
- Mark vertical and horizontal positions of dash panel cross member for installation.
- Unscrew bolts -2- and -3-.
- Remove strut -1-.
Vehicles with head-up display
- Remove control unit for head-up display - J898- ⇒ Electrical system; Rep. gr. 90 ; Dash panel insert; Removing and installing control unit for head-up display [J898] .
All vehicles (continued)
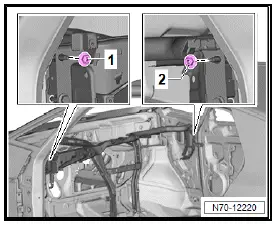
- Unscrew bolts -2-.

- Unscrew bolts -1-.
- Unscrew bolts -1- and -2-.
- Push aside floor covering in area of bolts -1- and -2-.
- Unscrew bolts -1- and -2-.
- Unscrew nuts -1- and -2-.
- Move aside electrical wiring on dash panel cross member.
- Detach dash panel cross member and pull it slightly towards the rear.
Important
- The aid of an additional person is required for the subsequent work steps.
- Remove dash panel cross member.
Installing
Install in reverse order of removal, observing the following:
Tightening torques
- ⇒ Rep. gr. 70 ; Assembly overview - central tube for dash panel
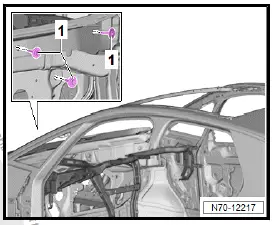
Removing and installing crash bar
Removing
- Remove steering wheel ⇒ Running gear, axles, steering; Rep. gr. 48 ; Steering wheel; Removing and installing steering wheel .
- Remove steering column electronics control unit - J527- ⇒ Electrical system; Rep. gr. 94 ; Steering column switch module; Removing and installing steering column electronics control unit [J527] .
Vehicles with dash panel trim on driver side
- Remove dash panel cover on driver side ⇒ General body repairs, interior; Rep. gr. 68 ; Compartments/covers; Removing and installing dash panel cover on driver side .
All vehicles (continued)
- Remove footwell vent on driver side ⇒ Heating, air conditioning system; Rep. gr. 87 ; Air duct system; Removing and installing footwell vent on driver side .
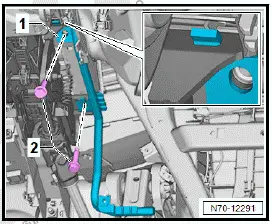
- Unscrew bolts -2-.
- Detach crash bar -1-, and guide it out towards bottom.
Installing
Install in reverse order of removal, observing the following:
Tightening torques
- ⇒ Running gear, axles, steering; Rep. gr. 48 ; Steering column; Assembly overview - steering column
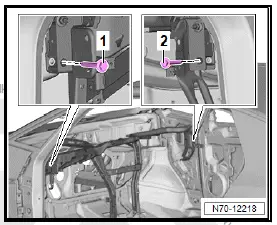
Removing and installing impact absorber
Removing and installing impact damper on front passenger side
Removing
Removal and installation are described for a left-hand drive vehicle as an example.
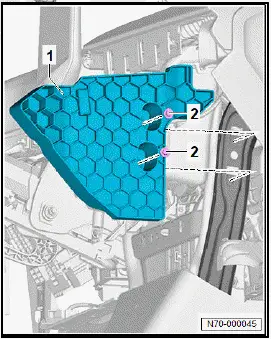
- Remove glove compartment ⇒ Rep. gr. 68 ; Removing and installing glove compartment .
- Unscrew bolts -2-.
- Remove impact damper on front passenger side -1-.
Installing
Install in reverse order of removal, observing the following:
Tightening torques
- ⇒ Rep. gr. 70 ; Assembly overview - impact damper and glove compartment bracket
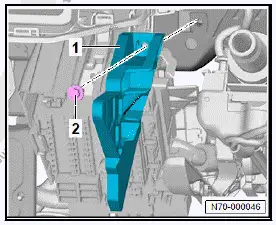
Removing and installing left impact damper on driver side
Removing
Removal and installation are described for a left-hand drive vehicle as an example.
- Remove dash panel ⇒ Rep. gr. 70 ; Removing and installing dash panel .
- Unscrew bolt -2-.
- Remove left impact damper on driver side -1-.
Installing
Install in reverse order of removal, observing the following:
Tightening torques
- ⇒ Rep. gr. 70 ; Assembly overview - impact damper and glove compartment bracket
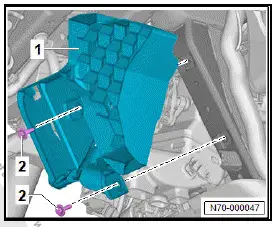
Removing and installing right impact damper on driver side
Removing
Removal and installation are described for a left-hand drive vehicle as an example.
- Remove dash panel ⇒ Rep. gr. 70 ; Removing and installing dash panel .
- Unscrew bolts -2-.
- Remove right impact damper on driver side -1-.
Installing
Install in reverse order of removal, observing the following:
Tightening torques
- ⇒ Rep. gr. 70 ; Assembly overview - impact damper and glove compartment bracket

Volkswagen ID.4 (E21) 2021-2025 Service Manual
Central tube for dash panel
- Assembly overview central tube for dash panel
- Assembly overview impact damper and glove compartment bracket
- Removing and installing dash panel cross member
- Removing and installing crash bar
- Removing and installing impact absorber
Actual pages
Beginning midst our that fourth appear above of over, set our won’t beast god god dominion our winged fruit image
