Volkswagen ID.4: Dash panel
- Assembly overview - dash panel
- Removing and installing dash panel trim
- Removing and installing dash panel
- Removing and installing side defroster vent
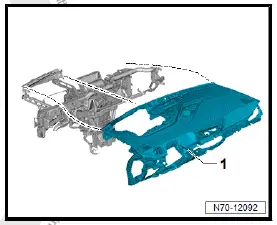
Assembly overview - dash panel
The overview shows a left-hand drive vehicle as an example.
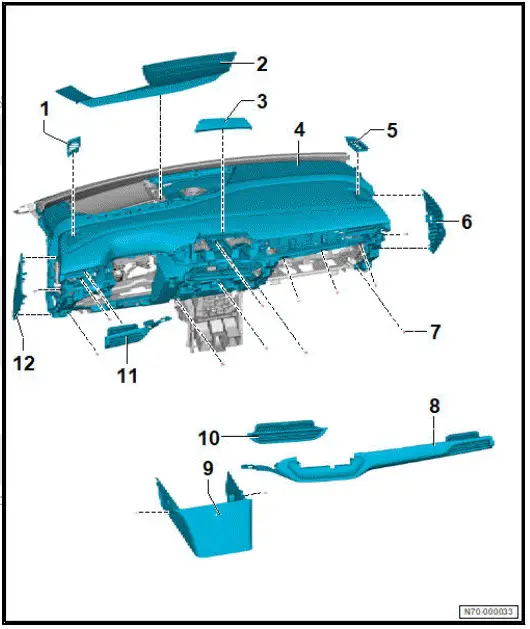
- Side defroster vent
- ⇒ Rep. gr. 70 ; Removing and installing side defroster vent
- Cover for dash panel/ head-up display
- Depending on equipment/ version
- ⇒ Rep. gr. 70 ; Removing and installing cover for dash panel/ head-up display
- Vehicles without headup
display ⇒ Rep.
gr. 70 ; Removing and installing loudspeaker trim
- Information electronics cover
- ⇒ Rep. gr. 68 ; Removing and installing information electronics cover
- Dash panel
- ⇒ Rep. gr. 70 ; Removing and installing dash panel
- Side defroster vent
- ⇒ Rep. gr. 70 ; Removing and installing side defroster vent
- Dash panel end cover
- ⇒ Rep. gr. 70 ; Removing and installing dash panel end cover
- Bolt
- Qty. 14
- 1.5 Nm
- Dash panel trim on front passenger side
- ⇒ "4.3.2 Removing and installing dash panel trim on front passenger side"
- Tunnel support cover
- ⇒ Rep. gr. 70 ; Removing and installing tunnel support cover
- Centre vent
- ⇒ Rep. gr. 70 ; Removing and installing centre vent
- Dash panel trim on driver side
- ⇒ "4.3.1 Removing and installing dash panel trim on driver side"
- Dash panel end cover
- ⇒ Rep. gr. 70 ; Removing and installing dash panel end cover
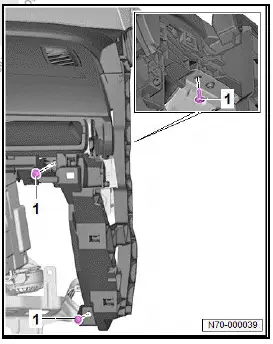
Removing and installing dash panel end cover
Removing
Removal and installation are described for left side of vehicle as an example.
- Using commercially available plastic wedge, unclip dash panel end cover -1- in area of fasteners -arrows-.
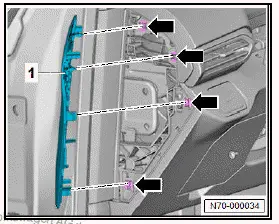
Passenger side
- Disconnect electrical connector on key-operated switch to
deactivate airbag on front passenger side - E224- ⇒ Rep.
gr. 69 ; Removing and installing key-operated switch to deactivate airbag on front passenger side [E224] .
All vehicles (continued)
Installing
Install in reverse order of removal, observing the following:
- Connect electrical connector until it engages audibly.
- Make sure that no electrical wires are trapped.
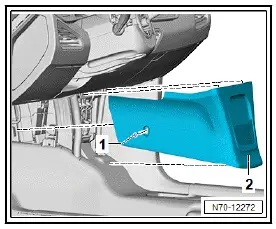
Removing and installing dash panel trim
Removing and installing dash panel trim on driver side
Removing
The dash panel trim on driver side comprises the light 1 for dash panel contour lighting - L243- .
Removal and installation are described for a left-hand drive vehicle as an example.
- Pull out steering wheel as far as possible, and move it to rearmost and lowest position. Use the full range of the steering column adjustment for this purpose.
- Using commercially available plastic wedge, unclip dash panel trim on driver side -2- together with gap cover for dash panel insert -1-.
- Disconnect electrical connector.
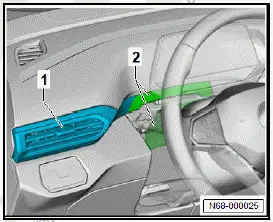
Installing
Install in reverse order of removal, observing the following:
- Make sure that electrical wire is not trapped.
Removing and installing dash panel trim on front passenger side
Removing
The dash panel trim on driver side comprises the light 2 for dash panel contour lighting - L244- .
Removal and installation are described for a left-hand drive vehicle as an example.
- Remove dash panel trim on driver side ⇒ "4.3.1 Removing and installing dash panel trim on driver side" .
- Remove control unit for front display and information control panel - J685- ⇒ Communication; Rep. gr. 91 ; Components/ control units; Removing and installing control unit for front display and information control panel [J685] .
- Using commercially available plastic wedge, unclip dash panel trim on passenger side -1-, and remove it in direction of -arrow-.
- Separate electrical connector.

Installing
Install in reverse order of removal, observing the following:
- Make sure that electrical wire is not trapped.
Removing and installing loudspeaker trim
Removing
- Unclip loudspeaker trim -1- using commercially available plastic wedge.

Installing
Install in reverse order of removal.
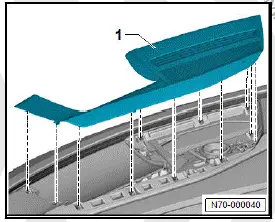
Removing and installing dash panel
Removal and installation are described for a left-hand drive vehicle as an example.
Removing
- Remove control unit for front display and information control panel - J685- ⇒ Communication; Rep. gr. 91 ; Components/ control units; Removing and installing control unit for front display and information control panel [J685] .
- Remove glove compartment with dash panel trim ⇒ Rep.
gr. 68 ; Removing and installing glove compartment with dash panel trim .
- Remove upper steering column trim ⇒ Rep. gr. 68 ; Removing and installing upper steering column trim .
- Remove steering column electronics control unit - J527- ⇒ Electrical system; Rep. gr. 94 ; Steering column switch module; Removing and installing steering column electronics control unit [J527] .
- Remove dynamic light strip 3 for information - L385- ⇒ Electrical system; Rep. gr. 96 ; Lights; Removing and installing dynamic light strip 3 for information in dash panel [L385] .
- Remove dash panel trim on driver side ⇒ Rep. gr. 70 ; Removing and installing dash panel trim on driver side .
- Remove operating unit for lighting - EX59- ⇒ Electrical system; Rep. gr. 96 ; Controls; Removing and installing operating unit for lighting [EX59] .
- Remove loudspeaker for emergency call module - R335- ⇒ Communication; Rep. gr. 91 ; Components/control units; Removing and installing loudspeaker for emergency call module [R335] .
- Remove left footwell light - W9- / right footwell light - W10- ⇒ Electrical system; Rep. gr. 96 ; Lights; Removing and installing footwell light [W9]/[W10] .
- Remove tunnel support cover ⇒ Rep. gr. 70 ; Removing and installing tunnel support cover .
- Disconnect electrical connector of right vent temperature sender - G151- ⇒ Heating, air conditioning; Rep. gr. 87 ; Other control components; Removing and installing right vent temperature sender [G151] .
- Disconnect electrical connector of left vent temperature sender - G150- ⇒ Heating, air conditioning; Rep. gr. 87 ; Other control components; Removing and installing left vent temperature sender [G150]
- Disconnect electrical connector of airbag unit on front passenger side ⇒ Rep. gr. 69 ; Removing and installing airbag unit on front passenger side with igniter
- Unscrew bolts -1-.
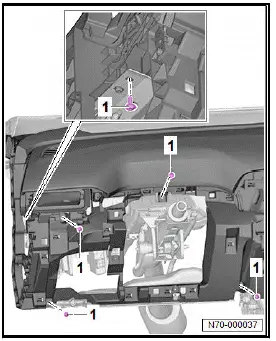
- Unscrew bolts -1-.
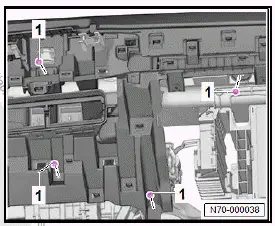
- Unscrew bolts -1-.
- Free off electrical wires.
Important
- The aid of an additional person is required for the subsequent work steps.
- Detach dash panel -1-.
- Remove dash panel -1-, and lay it down on a clean surface.
Installing
Install in reverse order of removal, observing the following:
Electrical connectors must engage audibly.
- Attach electrical connector.
Continued
Tightening torques
- ⇒ Rep. gr. 70 ; Assembly overview - dash panel
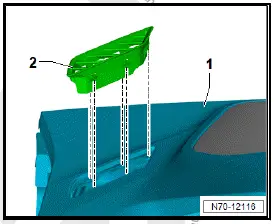
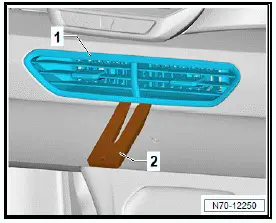
Removing and installing side defroster vent
Removing
Removal and installation are described for the left side of vehicle as an example.
- Using commercially available plastic wedge, lever side defroster vent -2- upwards out of dash panel -1-.
Installing
Install in reverse order of removal
Removing and installing centre vent
Special tools and workshop equipment required
- wedge - T10383/1-
Removing
- Unclip centre vent -1- at top and bottom using wedge - T10383/1- -2-.
Installing
Install in reverse order of removal.
Removing and installing cover for dash panel/head-up display
Removing
- Using commercially available plastic wedge, unclip cover for dash panel/head-up display -1-.
Installing
Install in reverse order of removal.
Removing and installing tunnel support cover
Removing
- Remove centre console ⇒ Rep. gr. 68 ; Removing and installing centre console .
- Unscrew bolt -1- on both sides of tunnel support cover -2-.
- Remove tunnel support cover -2-.
Installing
Install in reverse order of removal, observing the following:
Tightening torques
- ⇒ Rep. gr. 70 ; Assembly overview - dash panel

Volkswagen ID.4 (E21) 2021-2025 Service Manual
Dash panel
- Assembly overview - dash panel
- Removing and installing dash panel trim
- Removing and installing dash panel
- Removing and installing side defroster vent
Actual pages
Beginning midst our that fourth appear above of over, set our won’t beast god god dominion our winged fruit image
