Volkswagen ID.4: Compartments/covers
- Overview of fitting locations - storage compartments/covers/trim panels
- Assembly overview dash panel cover on driver side
- Assembly overview - dash panel cover (passenger side)
- Assembly overview - glove compartment
- Removing and installing dash panel cover on driver side
- Removing and installing gap cover for dash panel insert
- Removing and installing lower steering column trim
- Removing and installing glove compartment with dash panel trim
- Removing and installing glove compartment cover
- Service position of glove compartment
Overview of fitting locations - storage compartments/covers/trim panels
The overview shows a left-hand drive vehicle as an example.
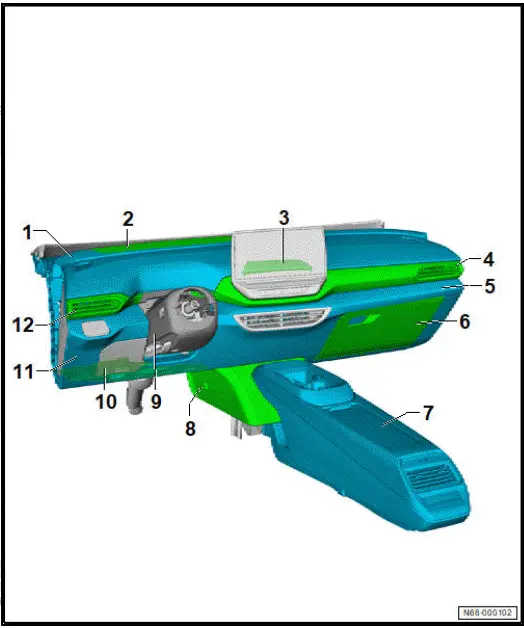
- Dash panel
- ⇒ Rep. gr. 70 ; Assembly overview - dash panel
- ⇒ Rep. gr. 70 ; Removing and installing dash panel
- Cover for dash panel/cover for head-up display
- ⇒ Rep. gr. 70 ; Removing and installing cover for dash panel/ head-up display
- Information electronics cover
- ⇒ Rep. gr. 68 ; Removing and installing information electronics cover
- Dash panel trim on front passenger side
- ⇒ Rep. gr. 70 ; Removing and installing dash panel trim
- Glove compartment with dash panel trim
- ⇒ Rep. gr. 68 ; Assembly overview - dash panel cover (passenger side)
- ⇒ Rep. gr. 68 ; Removing and installing glove compartment with dash panel trim
- Glove compartment cover
- ⇒ Rep. gr. 68 ; Assembly overview - glove compartment
- ⇒ Rep. gr. 68 ; Removing and installing glove compartment cover
- Centre console
- ⇒ Rep. gr. 68 ; Assembly overview - centre console
- ⇒ Rep. gr. 68 ; Removing and installing centre console
- Tunnel support cover
- ⇒ Rep. gr. 70 ; Removing and installing tunnel support cover
- Steering column trim
- Upper and lower
- ⇒ Rep. gr. 68 ; Assembly overview - steering column trim
- ⇒ Rep. gr. 68 ; Removing and installing upper steering column trim
- ⇒ Rep. gr. 68 ; Removing and installing lower steering column trim
- Driver side footwell cover
- ⇒ Rep. gr. 68 ; Removing and installing footwell cover (driver side)
- Dash panel cover on driver side
- ⇒ Rep. gr. 68 ; Assembly overview - dash panel cover (driver side)
- ⇒ Rep. gr. 68 ; Removing and installing dash panel cover on driver side
- Dash panel trim on driver side
- ⇒ Rep. gr. 70 ; Removing and installing dash panel trim
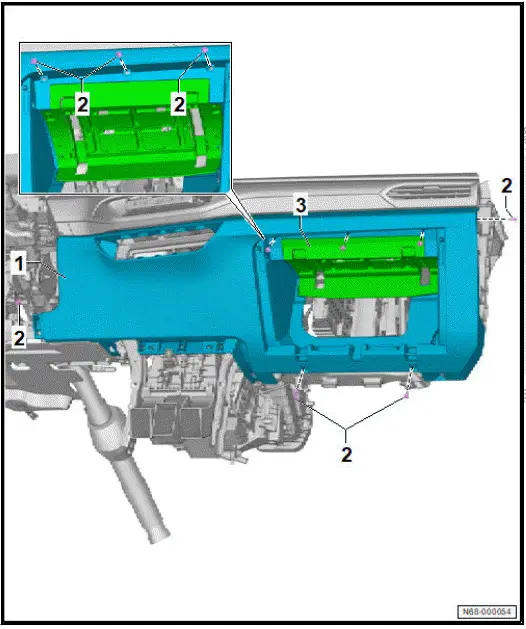
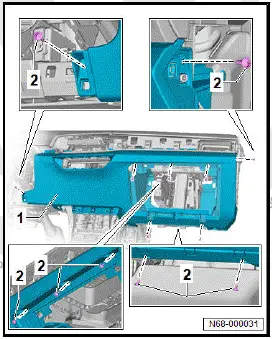
Assembly overview dash panel cover on driver side
Assembly overview dash panel cover on driver side, left-hand drive vehicles

- Dash panel end cover
- ⇒ Rep. gr. 70 ; Removing and installing dash panel end cover
- Retaining clip
- Qty. 2
- Dash panel cover on driver side
- ⇒ "2.6.1 Removing and installing dash panel cover on driver side, left-hand drive vehicles", page 9
- Bolt
- Qty. 3
- 1.5 Nm
- Fuse box cover
- Spreader rivet
- Qty. 3
- Driver side footwell cover
- ⇒ Rep. gr. 68 ; Removing and installing footwell cover on driver side
Assembly overview dash panel cover on driver side, right-hand drive vehicles

- Dash panel cover on driver side
- ⇒ "2.6.2 Removing and installing dash panel cover on driver side, right-hand drive vehicles", page 10
- Bolt
- Qty. 2
- 1.5 Nm
- Retaining clip
- Qty. 2
- Dash panel end cover
- ⇒ Rep. gr. 70 ; Removing and installing dash panel end cover
- Spreader rivet
- Qty. 3
- Driver side footwell cover
- ⇒ Rep. gr. 68 ; Removing and installing footwell cover on driver side
Assembly overview - dash panel cover (passenger side)
The overview shows a left-hand drive vehicle as an example.
- Glove compartment with dash panel trim
- ⇒ Rep. gr. 68 ; Removing and installing glove compartment with dash panel trim
- Bolt
- Qty. 7
- 1.5 Nm
- Glove compartment cover
- ⇒ Rep. gr. 68 ; Removing and installing glove compartment cover
Assembly overview - steering column trim
The overview shows a left-hand drive vehicle as an example.
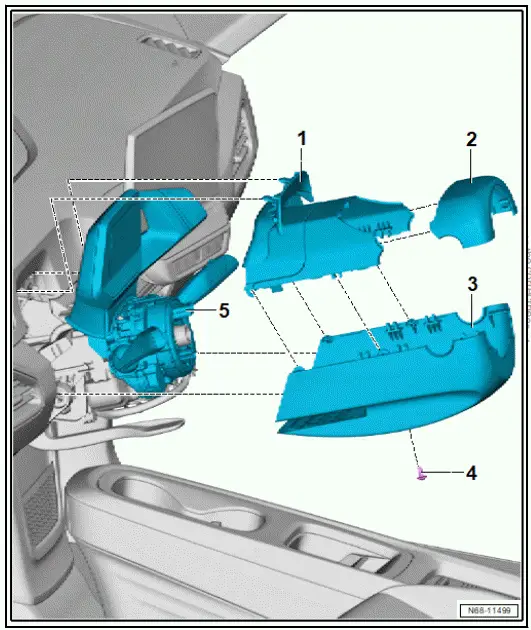
- Gap cover for dash panel insert
- ⇒ Rep. gr. 68 ; Removing and installing gap cover for dash panel insert
- Upper steering column trim
- ⇒ Rep. gr. 68 ; Removing and installing upper steering column trim 3 - Lower steering column trim ❑ ⇒ Rep. gr. 68 ; Removing and installing lower steering column trim
- Bolt
- 2.5 Nm
- Steering column electronics control unit - J527-
- ⇒ Electrical system; Rep. gr. 94 ; Steering column switch module; Removing and installing steering column electronics control unit [J527]
Assembly overview - glove compartment
The overview shows a left-hand drive vehicle as an example.

- Glove compartment with dash panel trim
- ⇒ Rep. gr. 68 ; Assembly overview - dash panel cover (passenger side)
- ⇒ Rep. gr. 68 ; Removing and installing glove compartment with dash panel trim
- Bolt
- Qty. 4
- 1.5 Nm
- Glove compartment cover
- ⇒ Rep. gr. 68 ; Removing and installing glove compartment cover
- Restrictor in glove compartment
- ⇒ Rep. gr. 68 ; Removing and installing restrictor for glove compartment
- Glove compartment cover
- ⇒ Rep. gr. 68 ; Removing and installing glove compartment cover
- ⇒ Rep. gr. 68 ; Service position of glove compartment
- Glove compartment opener
- ⇒ Rep. gr. 68 ; Removing and installing glove compartment opener
- Bolt
- 1.5 Nm
Removing and installing dash panel cover on driver side
Removing and installing dash panel cover on driver side, left-hand drive vehicles
Removing
- Remove dash panel end cover on driver side ⇒ Rep.
gr. 70 ; Removing and installing dash panel end cover .
- Unclip fuse box cover -3-.
- Unscrew bolts -2-.
- Release dash panel cover on driver side -1-.
- Disconnect electrical connector.
- Remove dash panel cover on driver side -1-.

Installing
Install in reverse order of removal, observing the following:
Tightening torques
- ⇒ "2.2.1 Assembly overview dash panel cover on driver side, left-hand drive vehicles",
Removing and installing dash panel cover on driver side, right-hand drive vehicles
Removing
- Remove dash panel end cover on driver side ⇒ Rep. gr. 70 ; Removing and installing dash panel end cover .
- Unscrew bolts -2-.
- Release dash panel cover on driver side -1-.
- Disconnect electrical connector.
- Remove dash panel cover on driver side -1-.

Installing
Install in reverse order of removal, observing the following:
Tightening torques
- ⇒ "2.2.2 Assembly overview dash panel cover on driver side, right-hand drive vehicles",
Removing and installing gap cover for dash panel insert
Removal and installation are described for a left-hand drive vehicle as an example.
Removing
- Pull out steering wheel as far as possible, and move it to lowest position. Use the full range of the steering column adjustment for this purpose.
- Unclip gap cover for dash panel insert -2- together with dash panel trim on driver side -1- using commercially available plastic wedge.

Installing
Install in reverse sequence of removal.
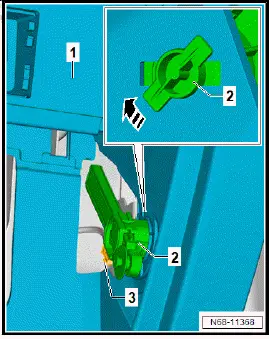
Removing and installing upper steering column trim
Removal and installation are described for a left-hand drive vehicle as an example.
Removing
- Remove steering wheel ⇒ Running gear, axles, steering; Rep. gr. 48 ; Steering wheel; Removing and installing steering wheel .
- Using commercially available plastic wedge, lever upper steering column trim -2- in direction of -arrow- off steering column electronics control unit - J527- -1-.

Installing
Install in reverse sequence of removal.
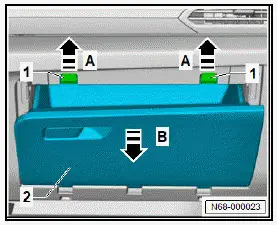
Removing and installing lower steering column trim
Removal and installation are described for a left-hand drive vehicle as an example.
Removing
Remove upper steering column trim ⇒ Rep. gr. 68 ; Removing and installing upper steering column trim .
- Unscrew bolt -2-.
- Swing lower steering column trim -1- in direction of -arrow A-, and unclip it.
- Disconnect electrical connector.
- Remove lower steering column trim -1- in direction of -arrow B-.

Installing
Install in reverse order of removal, observing the following:
Tightening torques
- ⇒ Rep. gr. 68 ; Assembly overview - steering column trim
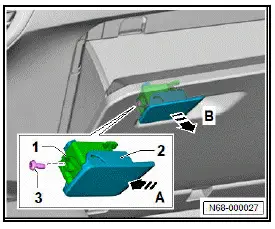
Removing and installing glove compartment opener
Removal and installation are described for a left-hand drive vehicle as an example.
Removing
- Open glove compartment cover.
- Unscrew bolt -3-.
- Push glove compartment opener -2- in direction of -arrow A-.
- Remove glove compartment opener -2- together with mounting frame -1- in direction of -arrow B-.
Installing
Install in reverse order of removal, observing the following:
Tightening torques
- ⇒ Rep. gr. 68 ; Assembly overview - glove compartment
Removing and installing glove compartment with dash panel trim
Glove compartment with dash panel trim will henceforth be referred to as "glove compartment".
Removal and installation are described for a left-hand drive vehicle as an example.
- Remove dash panel end cover ⇒ Rep. gr. 70 ; Removing and installing dash panel end cover .
- Remove glove compartment cover ⇒ Rep. gr. 68 ; Removing and installing glove compartment cover .
- Remove dash panel trim on front passenger side ⇒ Rep.
gr. 70 ; Removing and installing dash panel trim .
- Remove centre vent ⇒ Rep. gr. 70 ; Removing and installing steering centre vent .
- Remove dash panel trim on driver side ⇒ Rep. gr. 68 ; Removing and installing dash panel trim on driver side .
- Remove tunnel support cover ⇒ Rep. gr. 70 ; Removing and installing tunnel support cover .
- Unscrew bolts -2-.
- Remove glove compartment -1-.
- Disconnect electrical connectors.
Installing
Install in reverse order of removal, observing the following:
Tightening torques
- ⇒ Rep. gr. 68 ; Assembly overview - dash panel cover (passenger side)
Removing and installing glove compartment cover
Removal and installation are described for a left-hand drive vehicle as an example.
Removing
- Bring glove compartment cover to service position ⇒ Rep.
gr. 68 ; Glove compartment, service position .
- Push centring pins -3- in direction of -arrow-, and remove glove compartment cover -1- from glove compartment with dash panel trim -2-.
Installing
Install in reverse order of removal.
Removing and installing glove compartment cover
Removal and installation are described for a left-hand drive vehicle as an example.
Removing
- Remove glove compartment cover ⇒ Rep. gr. 68 ; Removing and installing glove compartment cover .
- Unscrew bolts -1-.
- Remove glove compartment cover -2-.
Installing
Install in reverse order of removal, observing the following:
Tightening torques
- ⇒ Rep. gr. 68 ; Assembly overview - glove compartment
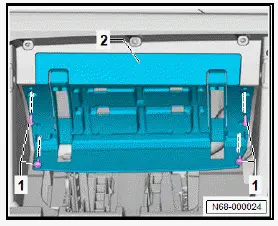
Removing and installing restrictor for glove compartment
Removal and installation are described for a left-hand drive vehicle as an example.
Removing
- Bring glove compartment cover to service position ⇒ Rep.
gr. 68 ; Glove compartment, service position .
- Disconnect electrical connector -3-.
- Twist restrictor -2- in direction of -arrow-.
- Remove restrictor -2-.
Installing
Install in reverse order of removal.
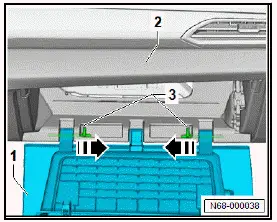
Service position of glove compartment
Moving to service position
- Open glove compartment cover -2-.
- Push buffer stops -1- in direction of -arrow A-, and fold out glove compartment cover -2- as far as stop in direction of -arrow B-.
- Unclip push rod from restrictor at side of glove compartment cover -2-.
Moving from service position
- Slowly close glove compartment cover until cover can be heard to engage.
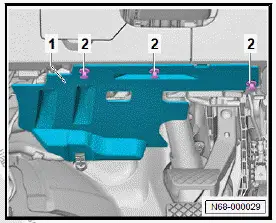
Removing and installing information electronics cover
Removing
- Use commercially available plastic wedge to unclip -arrowsinformation electronics cover -1-.

Installing
Install in reverse order of removal.
Removing and installing footwell cover on driver side
Removal and installation are described for a left-hand drive vehicle as an example.
Removing
- Pull out spreader rivets -2-.
- Remove footwell cover on driver side -1-.
Installing
Install in reverse order of removal, observing the following:
- Make sure that footwell cover on driver side is properly engaged in guide.

Volkswagen ID.4 (E21) 2021-2025 Service Manual
Compartments/covers
- Overview of fitting locations - storage compartments/covers/trim panels
- Assembly overview dash panel cover on driver side
- Assembly overview - dash panel cover (passenger side)
- Assembly overview - glove compartment
- Removing and installing dash panel cover on driver side
- Removing and installing gap cover for dash panel insert
- Removing and installing lower steering column trim
- Removing and installing glove compartment with dash panel trim
- Removing and installing glove compartment cover
- Service position of glove compartment
Actual pages
Beginning midst our that fourth appear above of over, set our won’t beast god god dominion our winged fruit image
