Volkswagen ID.4: Curtain airbags
Assembly overview - curtain airbag
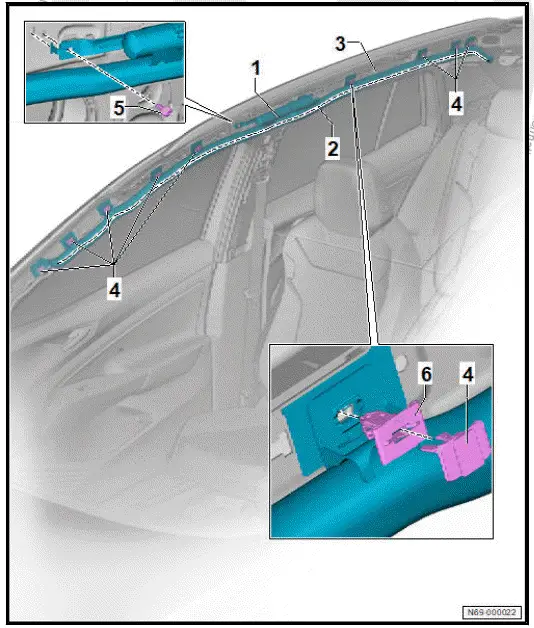
Assembly overview curtain airbag
The overview is shown for the right side of vehicle as an example.
- Curtain airbag
- With driver side curtain airbag igniter - N251- or front passenger side curtain airbag igniter - N252-
- ⇒ Rep. gr. 69 ; Removing and installing curtain airbag with igniter
- Line to prevent twisting
- Body
- Clip
- Qty. 9
- Renew after removing
- Bolt
- Renew after removing
- 4.5 Nm
- Clip
- Qty. 9
- Renew after removing
Assembly overview - curtain airbag, NAR
The overview is shown for the right side of vehicle as an example.
- Clip
- Qty. 9
- Renew after removing
- Bolt
- Renew after removing
- 4.5 Nm
- Curtain airbag
- With driver side curtain airbag igniter - N251- or front passenger side curtain airbag igniter - N252-
- ⇒ Rep. gr. 69 ; Removing and installing curtain airbag with igniter
- Twist prevention line
- Body
- Bolt
- 8 Nm
- Tether
- Clip
- Qty. 9
- Renew after removing

Removing and installing curtain airbag with igniter
Curtain airbag with driver side curtain airbag igniter - N251- or front passenger side curtain airbag igniter - N252- is referred to hereafter as curtain airbag.
Removal and installation are described for the right vehicle side as an example.
Removing
- Disconnect battery earth cable ⇒ Electrical system; Rep.
gr. 27 ; Battery; Disconnecting and connecting battery .
- Remove moulded headliner ⇒ Rep. gr. 70 ; Removing and installing moulded headliner .
CAUTION
It is possible to trigger pyrotechnic components unintentionally.
Risk of injury
- Discharge static electricity by briefly touching door striker plate.
- Release connector lock.
- Disconnect electrical connector.
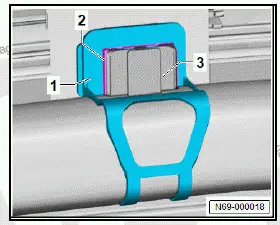
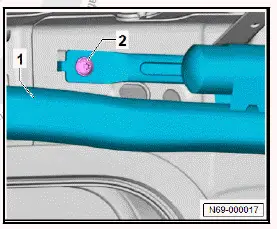
Note
The curtain airbag is secured to body by means of a bracket -1-, a clamp -2- and a clip -3-.
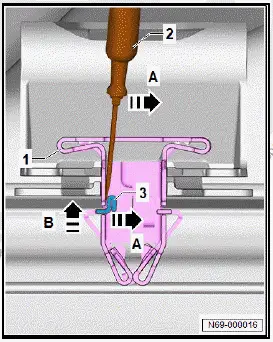
- Detach clip -3- from clamp -2- using commercially available pair of nippers.
- Position small screwdriver -2- in clamp -1- at upper left.
- Press locking device -3- in direction of -arrow A-. Using commercially available plastic wedge, push clamp -1- in direction of -arrow B-, and hold it there.
- Repeat procedure for second locking device at lower right.
- Remove clamp -1- together with curtain airbag from body mounting.
- Remove remaining clamps as described.
NAR vehicles
- Unscrew bolt -2-.
- Remove tether -1
All vehicles (continued)
- Unscrew bolt -2-.
- Remove curtain airbag -1-.
Installing
Install in reverse order of removal, observing the following: Clamps and clips must be replaced with new parts ⇒ Vehicle diagnostic tester.
CAUTION
It is possible to trigger pyrotechnic components unintentionally.
Risk of injury
- Discharge static electricity by briefly touching door striker plate.
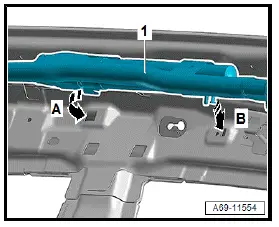
- Engage curtain airbag -1- in direction of -arrow A-.
- Engage curtain airbag -1- in direction of -arrow B-, and tighten bolt.
Important
- The twist prevention line must be visible throughout the entire length of the curtain airbag.
- Clip in curtain airbag -1- on body without twisting, starting at igniter and working towards front and towards rears.
- Pull curtain airbag -1- downwards at fasteners to make sure it is seated securely.
CAUTION
It is possible to trigger pyrotechnic components unintentionally.
Risk of injury
- Discharge static electricity by briefly touching door striker plate.
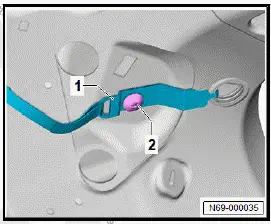
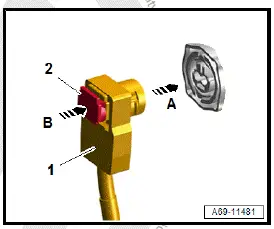
- Connect electrical connector -1- in direction of -arrow A- until it engages audibly.
- Engage connector lock -2- in direction of -arrow B-.
- Make sure that electrical wire is not trapped.
- Connect battery earth cable ⇒ Electrical system; Rep.
gr. 27 ; Battery; Disconnecting and connecting battery .
CAUTION
It is possible to trigger pyrotechnic components unintentionally.
Risk of injury.
- Stay as far back as possible from pyrotechnic components when switching on the ignition.
- Switch on ignition.
- Read and clear event memory using ⇒ Vehicle diagnostic tester.
Tightening torques
- ⇒ Rep. gr. 69 ; Assembly overview - curtain airbag

Volkswagen ID.4 (E21) 2021-2025 Service Manual
Curtain airbags
Actual pages
Beginning midst our that fourth appear above of over, set our won’t beast god god dominion our winged fruit image
