Volkswagen ID.4: Hydraulic system
- Bleeding hydraulic system
- Bleeding hydraulic system (additional bleeding procedure)
- Checking wheel brake cylinder for leaks
Bleeding hydraulic system
Special tools and workshop equipment required
- Brake filling and bleeding equipment -VAS 6860-
- Tool attachment -VAS 6564/9-
- Tool set for brake bleeding -VAS 6564-
Important
- A pre-pressure of 2 bar is required on the brake filling and bleeding equipment -VAS 6860- to bleed ABS hydraulic unit -N55-.
- Connect brake filling and bleeding equipment -VAS 6860- to brake fluid reservoir.
- Open bleeder screws in the specified order and bleed brake calipers and wheel brake cylinders:
- Front right brake caliper
- Front left brake caliper
- Rear left wheel brake cylinder
- Rear right wheel brake cylinder
Important
- Breather hose must sit tightly on bleeder valve so that no air can enter the brake system.
- Leave bleeder screw of a brake caliper/wheel brake cylinder open with bleeder breather hose still fitted until brake fluid discharges free of air bubbles.
If the brake pedal travel is too great or the brake pedal is "spongy", repeat the bleeding process five times, observing the following:
Important
- The aid of an additional mechanic is required for the subsequent work steps.
- Depress brake pedal firmly and hold.
- After bleeding, perform road test.
Important
- When doing this an ABS regulation must be performed at least once.
Tightening torques
Bleeder valves:
Drum brakes
- ⇒ Brake system; Rep. gr. 46; Rear brake; Assembly overview - rear brake, drum brake
Front disc brake
- ⇒ Brake system; Rep. gr. 46; Front brake; Assembly overview - front brake
- ⇒ Brake system; Rep. gr. 47; Front brake caliper; Assembly overview - front brake caliper
Rear disc brake
- ⇒ Brake system; Rep. gr. 46; Rear brake; Assembly overview - rear brake, disc brake
- ⇒ Brake system; Rep. gr. 47; Rear brake caliper; Assembly overview - rear brake caliper
Bleeding hydraulic system (additional bleeding procedure)
Special tools and workshop equipment required
- Brake filling and bleeding equipment -VAS 6860-
- Tool attachment -VAS 6564/9-
- Tool set for brake bleeding -VAS 6564-
Important
- Subsequent bleeding is carried out in connection with excessive brake pedal travel or so-called "spongy" brakes.
- The aid of an additional mechanic is required for the subsequent work steps.
- Connect brake filling and bleeding equipment -VAS 6860-.
- Depress brake pedal firmly and hold.
- Open bleeder valve on brake caliper.
- Fully depress brake pedal.
- Close bleed valve with pedal held down.
- Release brake pedal slowly.
Important
- This bleeding sequence must be carried out 5 times per brake caliper or wheel brake cylinder in the following sequence:
- Front right brake caliper
- Front left brake caliper
- Rear left wheel brake cylinder
- Rear right wheel brake cylinder
Important
- Breather hose must sit tightly on bleeder valve so that no air can enter the brake system.
- Leave bleeder screw of a brake caliper and wheel brake cylinder open with bleeder hoses still fitted until brake fluid discharges free of air bubbles.
- After bleeding, perform road test.
Important
- When doing this an ABS regulation must be performed at least once.
Tightening torques
Specified torques for bleeder screws:
- ⇒ Rep. gr. 46; Assembly overview - front brake
- ⇒ Rep. gr. 46; Assembly overview - brake shoes
Brake fluid change
⇒ Maintenance; Booklet ; Brake and clutch system: changing brake fluid
Leak test
Special tools and workshop equipment required
- M10 adapter -V.A.G 1310/6-
- tester for brake pressure regulator -V.A.G 1310A
Test precondition:
Important
- Brake system (hydraulic unit, brake hoses, brake lines, brake calipers and wheel brake cylinders) operating properly and free of leaks.
- Unscrew bleeder screw at one of front brake calipers.
- Screw M10 adapter -V.A.G 1310/6- into brake caliper in place of bleeder screw, and tighten it to specified torque of bleeder screw.
- Connect and bleed tester for brake pressure regulator - V.A.G 1310A-.
- Apply pressure to brake pedal until gauge indicates a pressure of 50 bar.
Important
- The pressure must not drop by more than 4 bar during the test period of 45 seconds. Renew brake master cylinder if drop in pressure exceeds specification.
Tightening torques
- ⇒ Rep. gr. 46; Assembly overview - front brake
Checking wheel brake cylinder for leaks
Special tools and workshop equipment required
- Removal wedge -3409-
Removing
- ⇒ Running gear, axles, steering; Rep. gr. 44; Wheels, tyres; Removing wheel
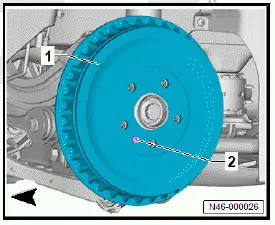
- Unscrew bolt -2-, and remove brake drum -1-.
NOTICE
Risk of damage to dust boot of wheel brake cylinder.
- Lift off dust boot carefully.
- Lift off dust boot -1- using removal wedge -3409- -2-.
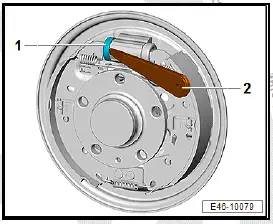
- If brake fluid is found in the dust boot, renew wheel brake cylinder.
- Fit brake drum, and secure it with bolt.
- ⇒ Running gear, axles, steering; Rep. gr. 44; Wheels, tyres; Installing wheel.
Tightening torques
- ⇒ Rep. gr. 46; Assembly overview - rear brake, drum brake
- ⇒ Rep. gr. 46; Assembly overview - brake shoes

Volkswagen ID.4 (E21) 2021-2025 Service Manual
Hydraulic system
- Bleeding hydraulic system
- Bleeding hydraulic system (additional bleeding procedure)
- Checking wheel brake cylinder for leaks
Actual pages
Beginning midst our that fourth appear above of over, set our won’t beast god god dominion our winged fruit image
