Volkswagen ID.4: Luggage compartment trims
- Overview of fitting locations - luggage compartment trims
- Assembly overview - luggage compartment side trim
- Assembly overview - lower rear lid trim
- Removing and installing lower rear lid trim
- Removing and installing luggage compartment side trim
- Removing and installing side rear lid trim
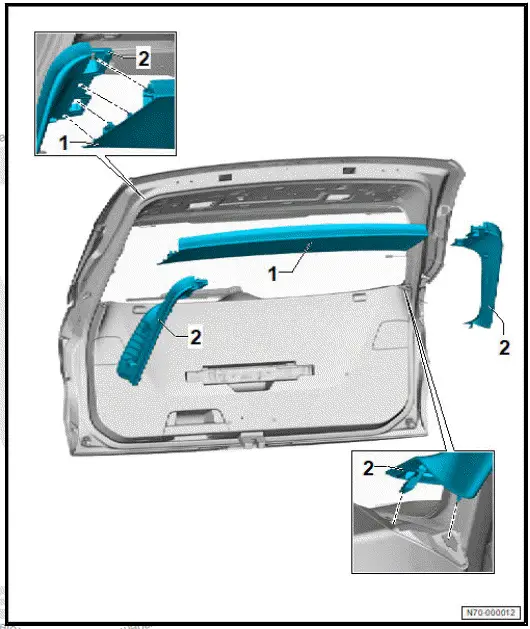
Overview of fitting locations - luggage compartment trims
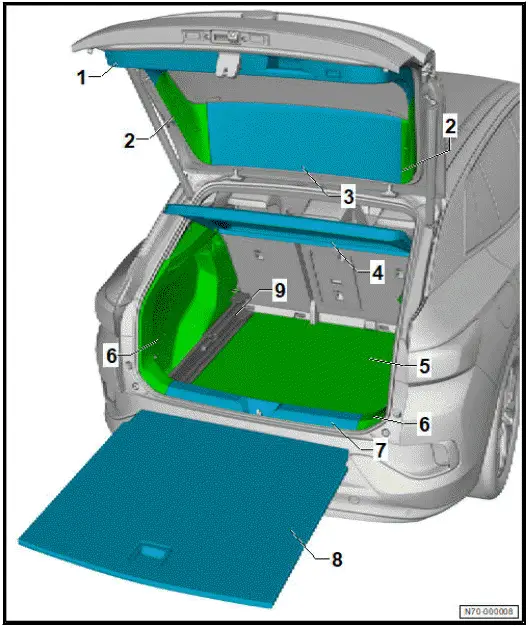
- Lower rear lid trim
- ⇒ Rep. gr. 70 ; Assembly overview - lower rear lid trim
- ⇒ Rep. gr. 70 ; Removing and installing lower rear lid trim
- Side rear lid trim
- ⇒ Rep. gr. 70 ; Assembly overview - upper rear lid trim
- ⇒ Rep. gr. 70 ; Removing and installing side rear lid trim
- Upper rear lid trim
- ⇒ Rep. gr. 70 ; Assembly overview - upper rear lid trim
- ⇒ Rep. gr. 70 ; Removing and installing upper rear lid trim
- Rear shelf
- Luggage compartment floor covering
- ⇒ Rep. gr. 70 ; Assembly overview - luggage compartment floor
- Luggage compartment side trim
- ⇒ Rep. gr. 70 ; Assembly overview - luggage compartment side trim
- ⇒ Rep. gr. 70 ; Removing and installing luggage compartment side trim
- Lock carrier trim
- ⇒ Rep. gr. 70 ; Removing and installing lock carrier trim
- Luggage compartment floor
- Depending on equipment/version
- ⇒ Rep. gr. 70 ; Assembly overview - luggage compartment floor
- Luggage compartment floor bracket
- Depending on equipment/version
- ⇒ Rep. gr. 70 ; Assembly overview - luggage compartment floor
- ⇒ Rep. gr. 70 ; Removing and installing support for luggage compartment floor
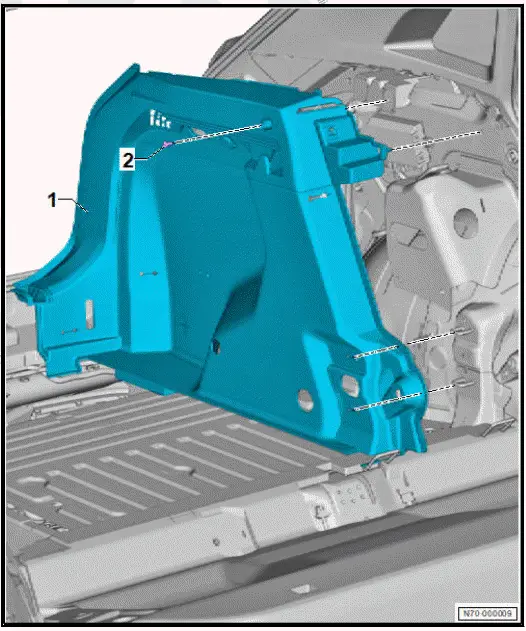
Assembly overview - luggage compartment side trim
The overview is shown for the left side of vehicle as an example.
- Luggage compartment side trim
- ⇒ Rep. gr. 70 ; Removing and installing luggage compartment side trim
- Bolt
- 2 Nm
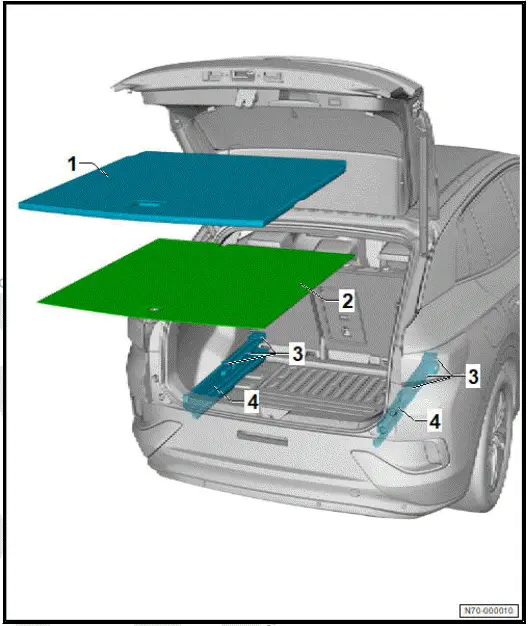
Assembly overview - luggage compartment floor
- Luggage compartment floor
- Depending on equipment/ version
- Luggage compartment floor covering
- Bolt
- Depending on equipment/ version
- Qty. 6
- 8 Nm
- Luggage compartment floor bracket
- Depending on equipment/ version
- ⇒ Rep. gr. 70 ; Removing and installing support for luggage compartment floor
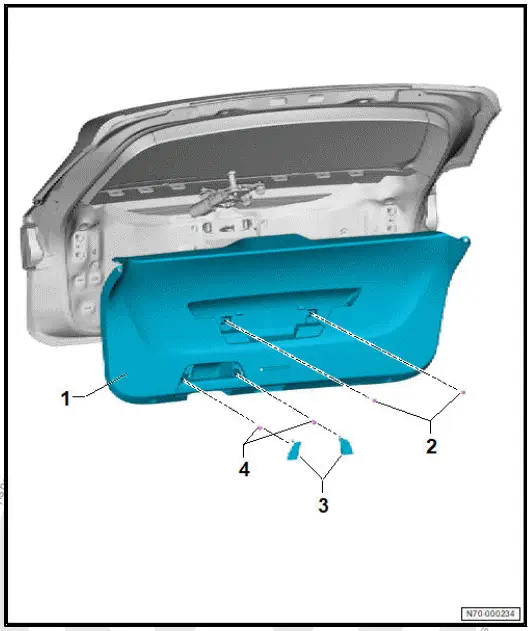
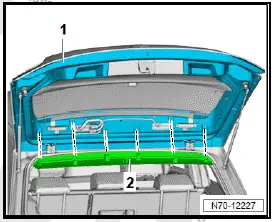
Assembly overview - lower rear lid trim
- Lower rear lid trim
- ⇒ Rep. gr. 70 ; Removing and installing lower rear lid trim
- Bolt
- Depending on equipment/ version
- Depending on model
- Qty. 2
- 1.5 Nm
- Cap
- Qty. 2
- Bolt
- Qty. 2
- 1.5 Nm
Assembly overview upper rear lid trim
- Upper rear lid trim
- ⇒ Rep. gr. 70 ; Removing and installing upper rear lid trim
- Rear lid side trim
- ⇒ Rep. gr. 70 ; Removing and installing side rear lid trim
Removing and installing lower rear lid trim
Special tools and workshop equipment required
- removal tool - T40280-
- removal wedge - 80-200-
Removing
- Remove warning triangle.
- Remove side rear lid trim ⇒ "7.11 Removing and installing side rear lid trim".
- Unclip caps -1- using commercially available plastic wedge.
- Unscrew bolts -1-.
- Use removal wedge - 80-200- to unclip lower rear lid trim -2- from rear lid -1-.
Vehicles with electrically operated rear lid
- Disconnect electrical connector for rear lid closure button - E574- .
All vehicles (continued)
Installing
Install in reverse order of removal, observing the following:
- Remove any retaining clips left in rear lid using removal tool - T40280- , and insert them into lower rear lid trim for installation.
Tightening torques
- ⇒ Rep. gr. 70 ; Assembly overview - lower rear lid trim
Removing and installing upper rear lid trim
Special tools and workshop equipment required
- removal tool - T40280-
- removal wedge - 80-200-
Removing
- Use removal wedge - 80-200- to unclip upper rear lid trim -2- from rear lid -1-.
Installing
Install in reverse order of removal, observing the following:
- Remove any retaining clips left in rear lid using removal tool - T40280- , and insert them into upper rear lid trim for installation.
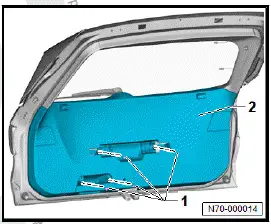
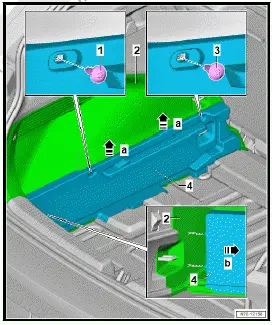
Removing and installing luggage compartment side trim
Removing
Removal and installation are described for the left side of vehicle as an example.
- Remove rear shelf.
- Remove first aid kit.
- Fold rear seat backrest towards front.
- Remove lock carrier trim ⇒ Rep. gr. 70 ; Removing and installing lock carrier trim .
- Remove C-pillar trim ⇒ Rep. gr. 70 ; Removing and installing C-pillar trim .
- Release rear sill panel moulding ⇒ "6.8 Removing and installing rear sill panel moulding"
Vehicles with luggage compartment floor
- Remove luggage compartment floor.
- Remove support for luggage compartment floor ⇒ Rep.
gr. 70 ; Removing and installing support for luggage compartment floor .
All vehicles (continued)
- Remove luggage compartment floor covering.
- Free off luggage compartment side trim -2- in area of rear lid seal.
- Unscrew bolt -1-
- Unclip luggage compartment side trim -2- in direction of -arrow-.
- Disconnect electrical connectors.
- Guide out the outer rear three-point seat belt.
Installing
Install in reverse order of removal, observing the following:
Tightening torques
- ⇒ Rep. gr. 70 ; Assembly overview - luggage compartment side trim
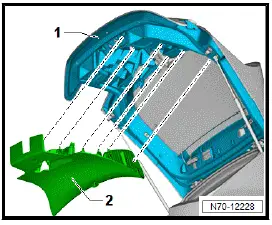
Removing and installing lock carrier trim
Special tools and workshop equipment required
- removal tool - T40280-
Removing
Vehicles with luggage compartment floor
- Remove luggage compartment floor.
All vehicles (continued)
- Remove luggage compartment floor covering.
- Free off lock carrier trim -1- in area of rear lid seal.
- Remove lock carrier trim -1- upwards.
Installing
Install in reverse order of removal, observing the following:
- Remove any retaining clips left in body using removal tool - T40280- , and insert them into lock carrier trim for installation.
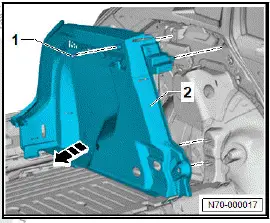
Removing and installing support for luggage compartment floor
Removing
Removal and installation are described for left side of vehicle as an example.
- Remove luggage compartment floor.
- Unscrew bolts -1- and -3-.
- Swivel support for luggage compartment floor -4- in direction of -arrow a-.
- Pull support for luggage compartment floor -4- towards front and out of luggage compartment side trim -2- -arrow b-, and remove it.
Installing
Install in reverse order of removal, observing the following:
Tightening torques
- ⇒ Rep. gr. 70 ; Assembly overview - luggage compartment floor
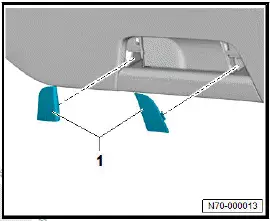
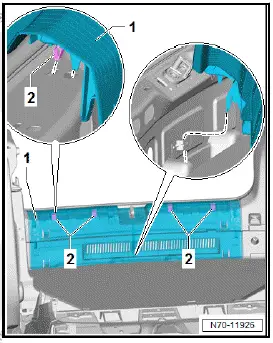
Removing and installing side rear lid trim
Special tools and workshop equipment required
- removal tool - T40280-
Removal and installation are described for left side of vehicle as an example.
Removing
- Remove upper rear lid trim ⇒ Rep. gr. 70 ; Removing and installing upper rear lid trim .
- Release side rear lid trim -1- in direction of -arrow B-.
- Remove side rear lid trim -1- from rear lid -2- in direction of -arrow A-.

Installing
Install in reverse order of removal, observing the following:
- Remove any retaining clips left in rear lid using removal tool - T40280- , and insert them into side rear lid trim for installation.

Volkswagen ID.4 (E21) 2021-2025 Service Manual
Luggage compartment trims
- Overview of fitting locations - luggage compartment trims
- Assembly overview - luggage compartment side trim
- Assembly overview - lower rear lid trim
- Removing and installing lower rear lid trim
- Removing and installing luggage compartment side trim
- Removing and installing side rear lid trim
Actual pages
Beginning midst our that fourth appear above of over, set our won’t beast god god dominion our winged fruit image
