Volkswagen ID.4: Rear seat covers and padding
- Assembly overview - rear bench seat cover and padding
- Assembly overview - rear seat backrest cover and padding
- Removing and installing cover and padding of rear bench seat
- Removing and installing cover and padding of rear seat backrest
- Separating rear bench seat cover from padding
- Separating rear seat backrest cover from padding
Assembly overview - rear bench seat cover and padding

- Seat cover
- Depending on equipment/ version
- ⇒ Rep. gr. 74 ; Removing and installing cover and padding of rear bench seat
- ⇒ Rep. gr. 74 ; Separating rear bench seat cover from padding
- Piping strip
- Sewn to seat cover
- Seat occupied sensor
- Rear seat occupied sensor on driver side - G177-
- Rear seat occupied sensor, centre - G1010-
- Rear seat occupied sensor on passenger side - G178-
- ⇒ Rep. gr. 69 ; Removing and installing rear seat occupied sensor [G177/ G178/G1010]
- Seat padding
- Depending on equipment/ version
- ⇒ Rep. gr. 74 ; Removing and installing cover and padding of rear bench seat
- ⇒ Rep. gr. 74 ; Separating rear bench seat cover from padding
- Upholstery clip
- Renew after removing
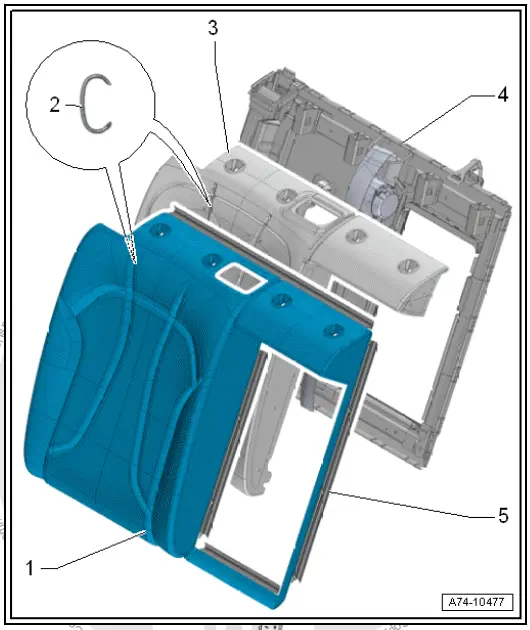
Assembly overview - rear seat backrest cover and padding
The overview is shown for the rear seat backrest (2/3) as an example.
- Backrest cover
- Depending on equipment/ version
- ⇒ Rep. gr. 74 ; Removing and installing cover and padding of rear seat backrest
- ⇒ Rep. gr. 74 ; Separating rear seat backrest cover from padding
- Upholstery clip
- Renew after removing
- Backrest padding
- Depending on equipment/ version
- ⇒ Rep. gr. 74 ; Removing and installing cover and padding of rear seat backrest
- ⇒ Rep. gr. 74 ; Separating rear seat backrest cover from padding
- Backrest frame
- Beading strip
- Sewn to backrest cover
Removing and installing cover and padding of rear bench seat
Special tools and workshop equipment required
- hook - 3370-
Removing
- Remove bench seat ⇒ Rep. gr. 72 ; Removing and installing bench seat/individual seats .
- Unclip child seat anchor guide of rear bench seat -1- upwards from rear bench seat -2-.

- Open securing channel and Velcro fastener -3-.
- Using hook - 3370- , open beading strips -1-.
- Remove cover -2- together with padding.

Installing
Install in reverse sequence of removal.
Removing and installing cover and padding of rear seat backrest
Removing
- Remove rear seat backrest ⇒ Rep. gr. 72 ; Removing and installing rear seat backrest .
- Remove head restraint ⇒ Rep. gr. 72 ; Removing and installing head restraint .
- Remove head restraint guides ⇒ Rep. gr. 72 ; Removing and installing head restraint guide .
- Remove locking mechanism trim ⇒ Rep. gr. 72 ; Removing and installing locking mechanism trim .
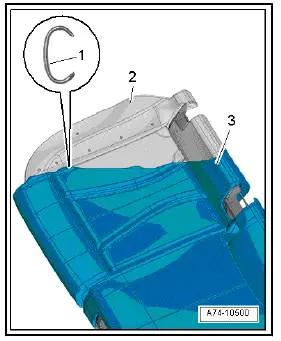
- Using commercially available plastic wedge, release clip -2- from cover -1- in area of inner pivot pin.

Rear left seat backrest (1/3)
- Starting at locking mechanism, lever beading strip -1- in direction of -arrow- all around off backrest frame -3-.
- Remove cover -2- together with padding.

All vehicles (continued)
Rear seat backrest (2/3) without load-through hatch
- Remove rear belt guide ⇒ Rep. gr. 69 ; Removing and installing rear belt guide .
- Starting at locking mechanism, lever beading strip -1- in direction of -arrow- all around off backrest frame -3-.
- Remove cover -2- together with padding.

All vehicles (continued)
Rear seat backrest (2/3) with load-through hatch
- Remove rear belt guide ⇒ Rep. gr. 69 ; Removing and installing rear belt guide .
- Remove flap for load-through hatch ⇒ Rep. gr. 72 ; Removing and installing flap for load-through hatch .
- Remove trim frame for load-through hatch ⇒ Rep. gr. 72 ; Removing and installing trim frame for load-through hatch .
- Starting at locking mechanism, lever beading strip -1- in direction of -arrow- all around off backrest frame -4-.
- Lever beading strip -2- all around off load-through hatch.
- Remove cover -3- together with padding.

All vehicles (continued)
Installing
Install in reverse sequence of removal.
Removing and installing intermediate padding, backrest with load-through hatch
Removing
- Fold down flap for load-through hatch.
- Release fasteners -1- using a commercially available screwdriver while at the same time pushing intermediate padding -2- as far as stop in direction of -arrow A-.
- Slightly raise intermediate padding in direction of -arrow B-, and detach it in direction of -arrow C-.

Installing
Install in reverse sequence of removal.
Separating rear bench seat cover from padding
Special tools and workshop equipment required
- upholstery clip pliers - V.A.G 1634B
Removing
- Remove cover and padding of rear bench seat ⇒ Rep. gr. 74 ; Removing and installing cover and padding of rear bench seat .
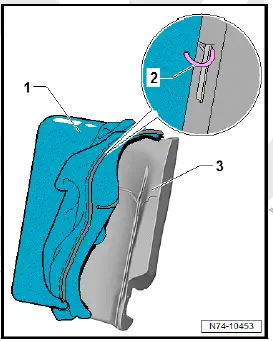
- Pull cover -3- as far as possible off padding -2-.
- Using commercially available pliers, open upholstery clips -1-.
- Separate cover -3- from padding -2-.
Installing
Install in reverse order of removal, observing the following:
- Secure upholstery clips in sequence -1- through -27- using upholstery clip pliers - V.A.G 1634B- .
- Make sure that the cover is fitted without creases.
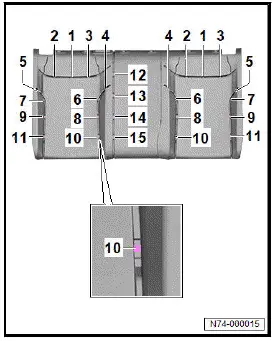
Separating rear seat backrest cover from padding
Special tools and workshop equipment required
- upholstery clip pliers - V.A.G 1634BID
Removing
- Remove cover and padding of rear seat backrest ⇒ Rep. gr. 74 ; Removing and installing cover and padding of rear seat backrest .
- Pull cover -1- off padding -3-.
- Using commercially available pliers, open upholstery clips -2-.
- Remove cover -1- from padding -3-.
Installing
Install in reverse order of removal, observing the following:
- Secure upholstery clips in sequence -1- through -11- using upholstery clip pliers - V.A.G 1634B- .
- Rear seat backrest without load-through hatch: secure upholstery clips -12- through -15-.
- Make sure that the cover is fitted without creases.

Volkswagen ID.4 (E21) 2021-2025 Service Manual
Rear seat covers and padding
- Assembly overview - rear bench seat cover and padding
- Assembly overview - rear seat backrest cover and padding
- Removing and installing cover and padding of rear bench seat
- Removing and installing cover and padding of rear seat backrest
- Separating rear bench seat cover from padding
- Separating rear seat backrest cover from padding
Actual pages
Beginning midst our that fourth appear above of over, set our won’t beast god god dominion our winged fruit image
