Volkswagen ID.4: Front passenger airbag
- Assembly overview - front passenger airbag
- Removing and installing front passenger airbag unit with igniter
- Removing and installing key-operated switch to deactivate airbag on front passenger side [E224]
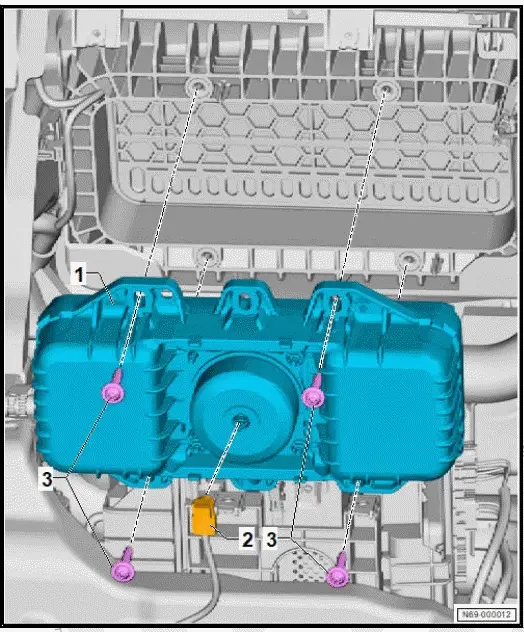
Assembly overview - front passenger airbag
- Front passenger airbag
- With front passenger side airbag igniter 1 - N131- .
- With front passenger
airbag unit - NX3- , incl.
airbag igniter 1 on front passenger side - N131- and airbag igniter 2 on front passenger side - N132-
- ⇒ Rep. gr. 69 ; Removing and installing front passenger airbag unit with igniter
- Electrical connector
- Depending on equipment/ installation period
- Bolt
- Qty. 4
- Renew after removing
Removing and installing front passenger airbag unit with igniter
Airbag unit with airbag igniter 1 on front passenger side - N131- or front passenger airbag unit - NX3- with airbag igniter 1 on front passenger side - N131- and airbag igniter 2 on front passenger side - N132- are referred to hereafter as airbag unit.
Removing
- Move front seat to rearmost position.
- Disconnect battery earth cable ⇒ Electrical system; Rep.
gr. 27 ; Battery; Disconnecting and connecting battery .
- Remove glove compartment cover ⇒ Rep. gr. 68 ; Removing and installing glove compartment cover .
CAUTION
It is possible to trigger pyrotechnic components unintentionally.
Risk of injury
- Discharge static electricity by briefly touching door striker plate.
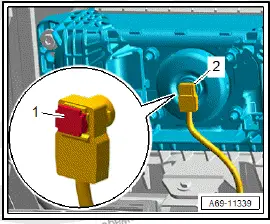
- Release connector lock -1-.
- Disconnect electrical connectors -2-.
Important
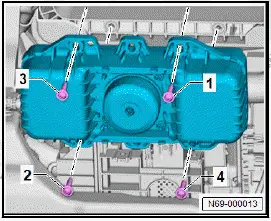
- Secure airbag unit -2- against falling down.
- Unscrew bolts -1- and -3-.
- Remove airbag unit -2- downwards.
WARNING
Risk of injury due to unintended deployment of the airbag unit.
- Place the airbag unit with the airbag facing upwards.
- Place airbag unit down.
Installing
Install in reverse order of removal, observing the following:
CAUTION
It is possible to trigger pyrotechnic components unintentionally.
Risk of injury
- Discharge static electricity by briefly touching door striker plate.
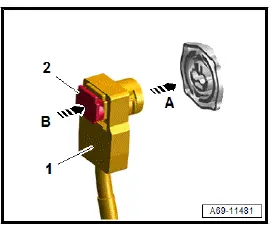
- Connect electrical connectors -1- in direction of -arrow Auntil they engage audibly.
- Engage connector lock -2- in direction of -arrow B-.
- Ensure that wire is not trapped.
- Connect battery earth cable ⇒ Electrical system; Rep.
gr. 27 ; Battery; Disconnecting and connecting battery .
CAUTION
Pyrotechnic components can trigger unintentionally.
Risk of injury.
- Keep far away from pyrotechnic components when switching on ignition.
- Switch on ignition.
- Read and clear event memory using ⇒ Vehicle diagnostic tester.
Tightening torques
- ⇒ Rep. gr. 69 ; Assembly overview - front passenger airbag
Removing and installing key-operated switch to deactivate airbag on front passenger side [E224]
The key-operated switch to deactivate airbag on front passenger side - E224- will henceforth be referred to as "key-operated switch".
Removing
- Remove dash panel end cover on front passenger side ⇒ Rep. gr. 70 ; Removing and installing dash panel end cover .
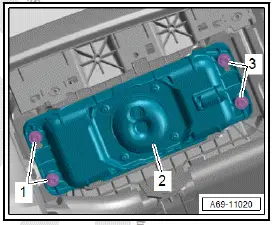
- Release connector lock -2- in direction of -arrow-.
- Disconnect electrical connector -3-.
- Press together retaining springs -4-.
![Volkswagen ID.4. Removing and installing key-operated switch to deactivate airbag on front passenger side [E224]](images/manuals/353/volkswagen_id_4_passenger_side_e224__226.webp)
Note
Pay attention to the position of the key-operated switch.
- Push out key-operated switch -1-.
Installing
Install in reverse order of removal, observing the following:
- Make sure that the key-operated switch is in its original position, and push it into dash panel end cover until it can be heard to engage.
- Connect electrical connector until it engages audibly.
- Make sure that no electrical wires are trapped.

Volkswagen ID.4 (E21) 2021-2025 Service Manual
Front passenger airbag
- Assembly overview - front passenger airbag
- Removing and installing front passenger airbag unit with igniter
- Removing and installing key-operated switch to deactivate airbag on front passenger side [E224]
Actual pages
Beginning midst our that fourth appear above of over, set our won’t beast god god dominion our winged fruit image
