Volkswagen ID.4: Front seats
- Overview of fitting locations electrical and electronic components
- Assembly overview front seat
- Assembly overview - front backrest
- Assembly overview - head restraint
- Assembly overview seat pan
- Assembly overview seat height adjustment
- Assembly overview lumbar support
- Removing and installing front seat
- Removing and installing trim for backrest with integrated head restraint
- Removing and installing seat height adjuster
- Removing and installing head restraint
- Removing and installing head restraint
- Removing and installing head restraint guide
- Removing and installing lumbar support adjustment switch [E176]/[E177]
- Removing and installing lumbar support
- Removing and installing bracket for seat trim
- Removing and installing outer seat trim
- Removing and installing seat depth adjuster
- Removing and installing seat adjustment control unit
- Removing and installing wiring harness for seat frame
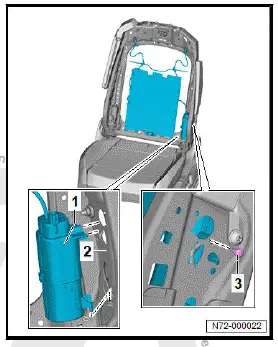
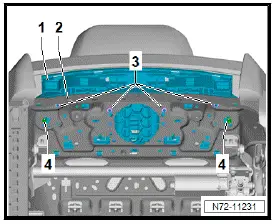
Overview of fitting locations electrical and electronic components
Overview of fitting locations - electrical and electronic components
Overview shown for left side of vehicle as an example
- Inner side airbag, driver side
- With igniter for central airbag for occupant collision protection, driver side - N737-
- Fitted on driver side
- ⇒ Rep. gr. 69 ; Assembly overview - front side airbag, inner side
- ⇒ Rep. gr. 69 ; Removing and installing front side airbag, inner side
- Backrest heating element
- With heated backrest for front left seat - Z116- or heated backrest for front right seat - Z117-
- Depending on equipment/ version
- ⇒ Rep. gr. 74 ; Removing and installing backrest heating element [Z116]/[Z117]
- Lumbar support
- Depending on equipment/ version
- Cannot be renewed individually
- ⇒ Rep. gr. 72 ; Removing and installing lumbar support
- Front side airbag, outer side
- With side airbag igniter on driver side - N199- or side airbag igniter on front passenger side - N200-
- ⇒ Rep. gr. 69 ; Assembly overview - front side airbag, outer side
- ⇒ Rep. gr. 69 ; Removing and installing front side airbag, outer side
- Compressor for multicontour driver seat - V439- / compressor for multicontour front passenger seat - V440-
- Depending on equipment/version
- Cannot be renewed individually
- ⇒ Rep. gr. 72 ; Removing and installing lumbar support
- Seat height adjuster
- With driver seat height adjustment motor - V245- or front passenger seat height adjustment motor - V246-
- Depending on equipment/version
- ⇒ Rep. gr. 72 ; Assembly overview - seat height adjustment
- ⇒ Rep. gr. 72 ; Removing and installing seat height adjuster
- Driver seat adjustment operating unit - E470- / front passenger seat adjustment operating unit - E471-
- Depending on equipment/version
- ⇒ Rep. gr. 72 ; Removing and installing seat adjustment operating unit [E470]/[E471]
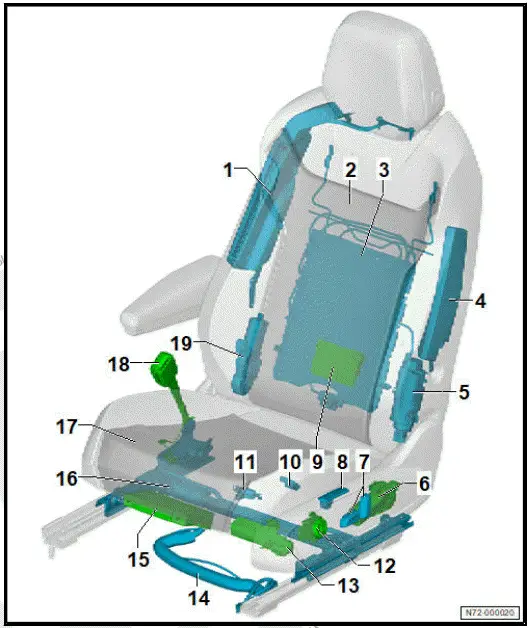
- Driver operating unit for memory settings - E464- / front passenger operating unit for memory settings - E465-
- Depending on equipment/version
- ⇒ "3.30 Removing and installing operating unit for memory settings [E464]/[E465]"
- Massage seat control unit
- With control unit for front left massage seat - J803- or control unit for front right massage seat - J804-
- Depending on equipment/version
- Cannot be renewed individually
- ⇒ Rep. gr. 72 ; Removing and installing lumbar support
- Left footwell light - W9- / right footwell light - W10-
- ⇒ Electrical system; Rep. gr. 96 ; Lights; Removing and installing footwell light W9/W10
- Seat occupied sensor on driver side - G1067- / seat occupied sensor on front passenger side - G128-
- ⇒ Rep. gr. 69 ; Removing and installing front seat occupied sensor [G1067]/[G128]
- Driver seat lumbar support adjustment switch - E176- / front passenger seat lumbar support adjustment switch - E177-
- Depending on equipment/version
- ⇒ Rep. gr. 72 ; Removing and installing lumbar support adjustment switch [E176]/[E177]
- Driver seat rake adjustment motor - V243- / front passenger seat rake adjustment motor - V244-
- Depending on equipment/version
- ⇒ Rep. gr. 72 ; Removing and installing seat rake adjustment motor [V243]/[V244]
- Electrical wire
- Seat and steering column adjustment control unit with memory - J136- / front passenger seat adjustment control unit with memory - J521-
- Depending on equipment/version
- ⇒ Rep. gr. 72 ; Removing and installing seat adjustment control unit
- Driver seat longitudinal adjustment motor - V28- / front passenger seat longitudinal adjustment motor - V31-
- Depending on equipment/version
- Cannot be renewed individually
- ⇒ Rep. gr. 72 ; Removing and installing seat longitudinal adjustment motor [V28]/[V31]
- Front left seat heating - ZX11- / front right seat heating - ZX13-
- Depending on equipment/version
- ⇒ Rep. gr. 74 ; Removing and installing seat heating element [ZX11]/[ZX13]
- Driver side belt switch - E24- / front passenger side belt switch - E25-
- ⇒ Rep. gr. 69 ; Assembly overview - front belt buckle
- ⇒ Rep. gr. 69 ; Removing and installing front belt buckle
- Driver seat backrest adjustment motor - V45- / front passenger seat backrest adjustment motor - V46-
- Depending on equipment/version
- Cannot be renewed individually
- ⇒ Rep. gr. 72 ; Removing and installing front backrest
Overview of fitting locations - electrical and electronic components, NAR
Overview is shown for right side of vehicle as an example
- Front side airbag, outer side
- With side airbag igniter on front passenger side - N200- .
- ⇒ Rep. gr. 69 ; Assembly overview - front side airbag, outer side
- ⇒ Rep. gr. 69 ; Removing and installing front side airbag, outer side
- Backrest heating element
- With heated backrest for front right seat - Z117- or heated backrest for front left seat - Z116-
- Depending on equipment/ version
- ⇒ Rep. gr. 74 ; Removing and installing backrest heating element [Z116]/[Z117]
- Lumbar support
- Depending on equipment/ version
- Cannot be renewed individually
- ⇒ Rep. gr. 72 ; Removing and installing lumbar support
- Front passenger seat backrest adjustment motor - V46-
- Depending on equipment/version
- Cannot be renewed individually
- ⇒ Rep. gr. 72 ; Removing and installing front backrest
- Front passenger side belt switch - E25-
- ⇒ Rep. gr. 69 ; Assembly overview - front belt buckle
- ⇒ Rep. gr. 69 ; Removing and installing front belt buckle
- Front right seat heating - ZX13- / front left seat heating - ZX11-
- Depending on equipment/version
- ⇒ Rep. gr. 74 ; Removing and installing seat heating element [ZX11]/[ZX13]
- Front passenger seat longitudinal adjustment motor - V31-
- Depending on equipment/version
- Cannot be renewed individually
- ⇒ Rep. gr. 72 ; Removing and installing driver seat longitudinal adjustment motor [V28]
- Seat and steering column adjustment control unit with memory - J136- / front passenger seat adjustment control unit with memory - J521-
- Depending on equipment/version
- ⇒ Rep. gr. 72 ; Removing and installing seat adjustment control unit
- Front passenger side seat position sensor - G554-
- ⇒ Rep. gr. 72 ; Assembly overview - seat pan
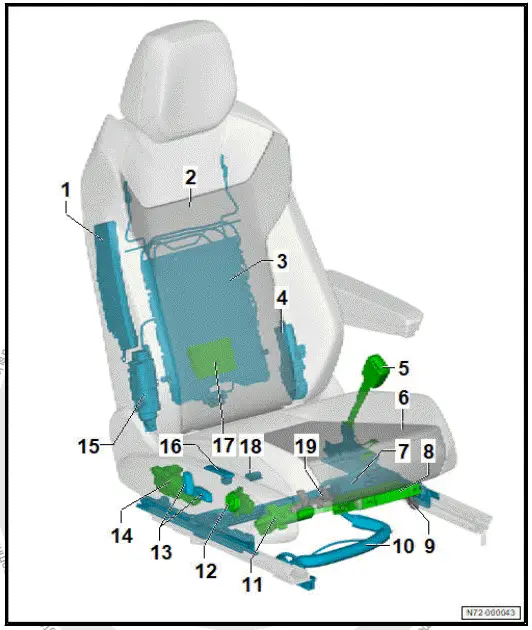
- Electrical wire
- Front passenger seat rake adjustment motor - V244-
- Depending on equipment/version
- ⇒ Rep. gr. 72 ; Removing and installing seat rake adjustment unit
- Front passenger seat lumbar support adjustment switch - E177-
- Depending on equipment/version
- ⇒ Rep. gr. 72 ; Removing and installing lumbar support adjustment switch [E176]/[E177]
- Driver seat adjustment operating unit - E470- / front passenger seat adjustment operating unit - E471-
- Depending on equipment/version
- ⇒ Rep. gr. 72 ; Removing and installing seat adjustment operating unit [E470]/[E471]
- Front passenger seat height adjustment motor - V246-
- Depending on equipment/version
- ⇒ Rep. gr. 72 ; Assembly overview - seat height adjustment
- ⇒ Rep. gr. 72 ; Removing and installing seat height adjuster
- Compressor for multicontour passenger seat - V440-
- Cannot be renewed individually
- Depending on equipment/version
- ⇒ Rep. gr. 72 ; Removing and installing lumbar support
- Front passenger operating unit for memory settings - E465-
- Depending on equipment/version
- ⇒ Rep. gr. 72 ; Removing and installing operating unit for memory settings [E464]/[E465]
- Control unit for front right massage seat - J804- / control unit for front left massage seat - J803-
- Cannot be renewed individually
- Depending on equipment/version
- ⇒ Rep. gr. 72 ; Removing and installing lumbar support
- Left footwell light - W9- / right footwell light - W10-
- ⇒ Electrical system; Rep. gr. 96 ; Lights; Removing and installing footwell light W9/W10
- Seat occupied recognition control unit - J706-
- ⇒ Rep. gr. 69 ; Removing and installing seat occupied recognition control unit [J706]
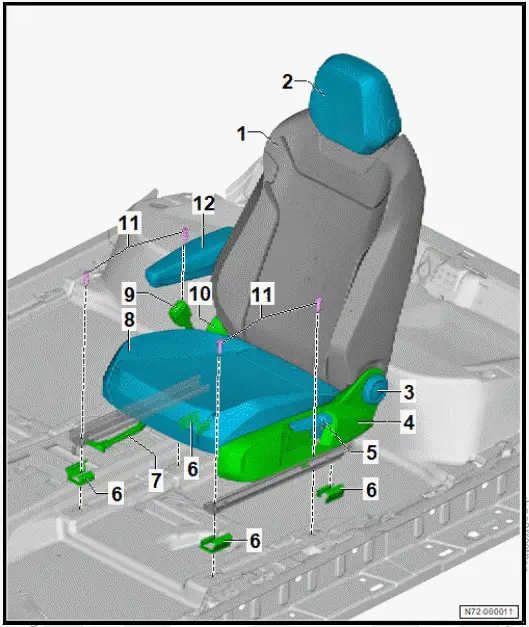
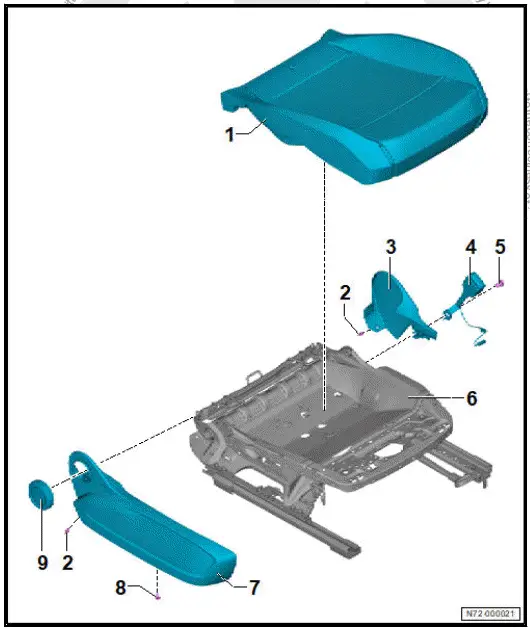
Assembly overview front seat
Assembly overview - front seat, manually adjustable
Overview shown for left side of vehicle as an example
- Front backrest
- ⇒ Rep. gr. 72 ; Assembly overview - front backrest
- ⇒ Rep. gr. 72 ; Removing and installing front backrest
- Head restraint
- ⇒ Rep. gr. 72 ; Assembly overview - head restraint
- ⇒ Rep. gr. 72 ; Removing and installing head restraint
- Backrest adjustment handle
- ⇒ Rep. gr. 72 ; Removing and installing backrest adjustment handle
- Outer side trim
- ⇒ Rep. gr. 72 ; Removing and installing outer seat trim
- Handle for seat height adjustment
- ⇒ Rep. gr. 72 ; Removing and installing seat height adjustment handle
- Seat rail cover
- Qty. 4
- Seat longitudinal adjustment handle
- ⇒ Rep. gr. 72 ; Removing and installing seat longitudinal adjustment handle
- Seat pan
- ⇒ Rep. gr. 72 ; Assembly overview - seat pan
- Front belt buckle
- ⇒ Rep. gr. 69 ; Assembly overview - front belt buckle
- ⇒ Rep. gr. 69 ; Removing and installing front belt buckle
- Inner seat trim
- ⇒ Rep. gr. 72 ; Removing and installing inner seat trim
- Bolt
- Qty. 4
- 40 Nm
- Centre armrest
- ⇒ Rep. gr. 68 ; Assembly overview - front centre armrest
- ⇒ Rep. gr. 68 ; Removing and installing front centre armrest
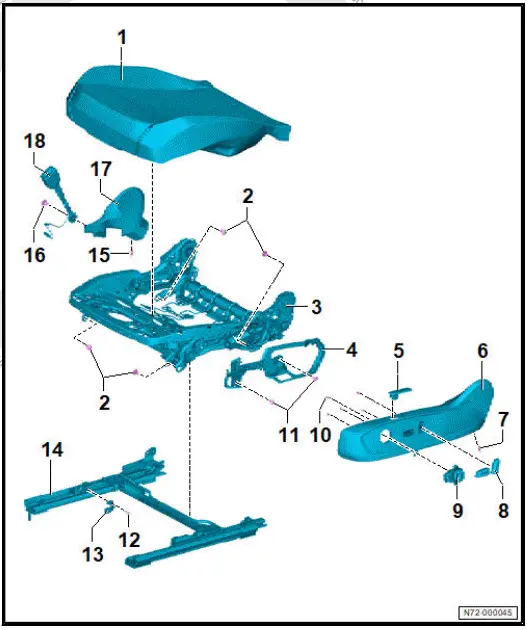
Assembly overview - front seat, electric adjustment
Overview shown for left side of vehicle as an example
- Front backrest
- ⇒ Rep. gr. 72 ; Assembly overview - front backrest
- ⇒ Rep. gr. 72 ; Removing and installing front backrest
- Head restraint
- ⇒ Rep. gr. 72 ; Assembly overview - head restraint
- ⇒ Rep. gr. 72 ; Removing and installing head restraint
- Outer seat trim
- ⇒ "3.26.1 Removing and installing outer seat trim"
- Driver operating unit for memory settings - E464- / front passenger operating unit for memory settings - E465-
- ⇒ Rep. gr. 72 ; Removing and installing operating unit for memory settings [E464]/[E465]
- Driver seat adjustment operating unit - E470- / front passenger seat adjustment operating unit - E471-
- ⇒ Rep. gr. 72 ; Removing and installing seat adjustment operating unit [E470]/[E471]
- Seat rail cover
- Qty. 4
- Driver seat lumbar support adjustment switch - E176- / front passenger seat lumbar support adjustment switch - E177-
- ⇒ Rep. gr. 72 ; Removing and installing lumbar support adjustment switch [E176]/[E177]
- Seat depth adjustment
- ⇒ Rep. gr. 72 ; Assembly overview - seat depth adjustment
- ⇒ Rep. gr. 72 ; Removing and installing seat depth adjuster
- Seat pan
- ⇒ Rep. gr. 72 ; Assembly overview - seat pan
- Front belt buckle
- ⇒ Rep. gr. 69 ; Assembly overview - front belt buckle
- ⇒ Rep. gr. 69 ; Removing and installing front belt buckle
- Inner seat trim
- ⇒ "3.25 Removing and installing inner seat trim"
- Bolt
- Qty. 4
- 40 Nm
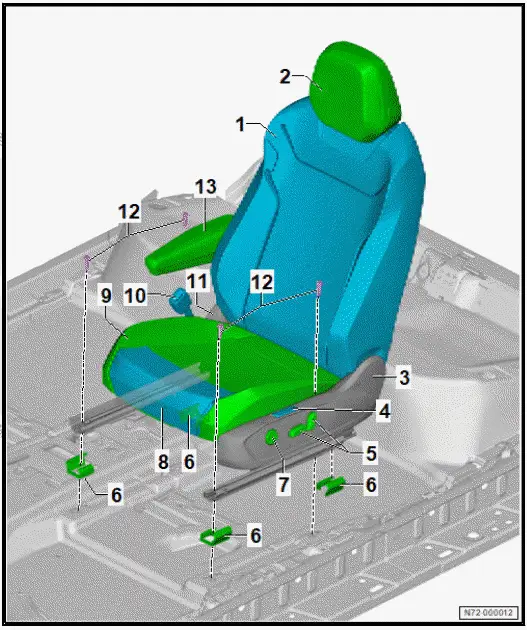
- Centre armrest
- ⇒ Rep. gr. 68 ; Assembly overview - front centre armrest
- ⇒ Rep. gr. 68 ; Removing and installing front centre armrest
Assembly overview - front seat, Top-Sport
Overview shown for left side of vehicle as an example
- Front centre armrest
- ⇒ Rep. gr. 68 ; Assembly overview - front centre armrest
- ⇒ Rep. gr. 68 ; Removing and installing front centre armrest
- Front backrest
- ⇒ Rep. gr. 72 ; Assembly overview - front backrest
- ⇒ Rep. gr. 72 ; Removing and installing front backrest
- Bolt
- Qty. 4
- 40 Nm
- Bolt
- Qty. 3
- Renew after removing
- 6.5 Nm
- Driver seat height adjustment motor - V245- / front passenger seat height adjustment motor - V246-
- ⇒ Rep. gr. 72 ; Removing and installing seat height adjustment unit, electrically adjustable
- Outer seat trim
- ⇒ Rep. gr. 72 ; Removing and installing outer seat trim
- Seat rail cover
- Qty. 2 or 4 depending on model
- Driver operating unit for memory settings - E464- / front passenger operating unit for memory settings - E465-
- ⇒ Rep. gr. 72 ; Removing and installing operating unit for memory settings [E464]/[E465]
- Driver seat adjustment operating unit - E470- / front passenger seat adjustment operating unit - E471-
- ⇒ Rep. gr. 72 ; Removing and installing seat adjustment operating unit [E470]/[E471]
- Driver seat lumbar support adjustment switch - E176- / front passenger seat lumbar support adjustment switch - E177-
- ⇒ Rep. gr. 72 ; Removing and installing lumbar support adjustment switch [E176]/[E177]
- Driver seat longitudinal adjustment motor - V28-
- ⇒ Rep. gr. 72 ; Removing and installing seat longitudinal adjustment motor [V28]
- Seat depth adjustment handle
- ⇒ Rep. gr. 72 ; Assembly overview - seat depth adjustment
- ⇒ Rep. gr. 72 ; Removing and installing seat depth adjuster
- Seat depth adjuster trim
- ⇒ Rep. gr. 72 ; Assembly overview - seat depth adjustment
- ⇒ Rep. gr. 72 ; Removing and installing seat depth adjuster
- Seat pan
- ⇒ Rep. gr. 72 ; Assembly overview - seat pan
- Front belt buckle
- ⇒ Rep. gr. 69 ; Assembly overview - front belt buckle
- ⇒ Rep. gr. 69 ; Removing and installing front belt buckle
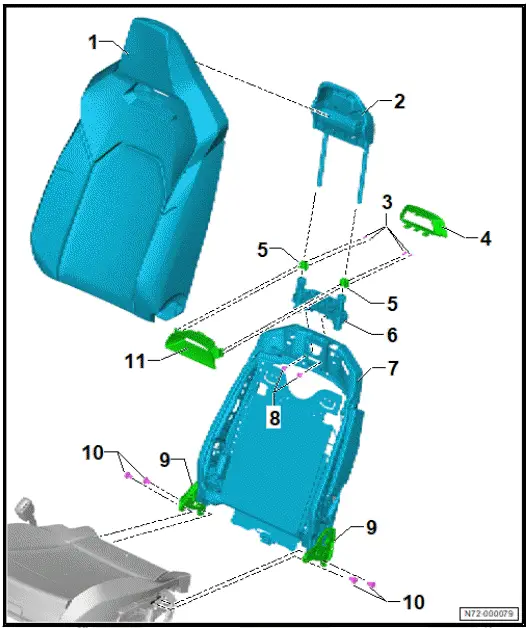
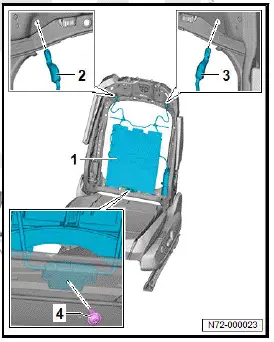
Assembly overview - front backrest
Assembly overview - front backrest
Overview shown for left side of vehicle as an example
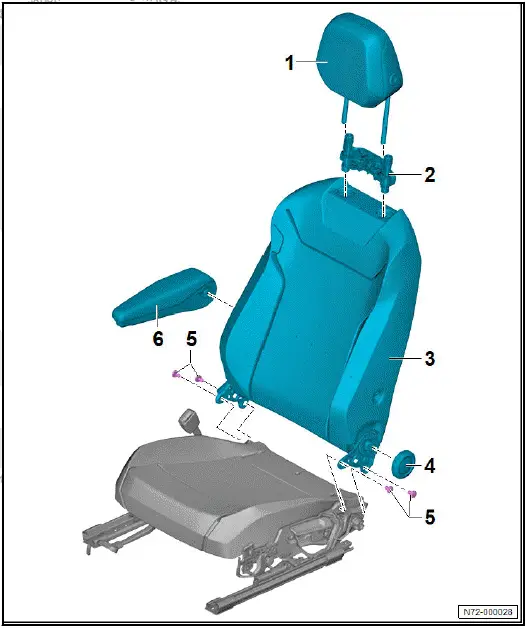
- Head restraint
- Depending on equipment/ version
- ⇒ Rep. gr. 72 ; Assembly overview - head restraint
- ⇒ Rep. gr. 72 ; Removing and installing head restraint
- Head restraint guide
- Depending on equipment/ version
- ⇒ Rep. gr. 72 ; Assembly overview - head restraint
- ⇒ Rep. gr. 72 ; Removing and installing head restraint guide
- Front backrest
- ⇒ Rep. gr. 72 ; Removing and installing front backrest
- Backrest adjustment handle
- For vehicles without electric backrest adjustment
- ⇒ Rep. gr. 72 ; Removing and installing backrest adjustment handle
- Bolt
- Qty. 4
- Renew after removing
- Centre armrest
- ⇒ Rep. gr. 68 ; Assembly overview - front centre armrest
- ⇒ Rep. gr. 68 ; Removing and installing front centre armrest
Specified torque and tightening sequence

Assembly overview - front backrest, Top-Sport
Overview shown for left side of vehicle as an example
- Backrest padding
- ⇒ Rep. gr. 74 ; Removing and installing backrest cover and padding
- ⇒ Rep. gr. 74 ; Separating backrest cover from backrest padding
- Head restraint
- ⇒ Rep. gr. 72 ; Removing and installing integrated head restraint
- Bolt
- Qty. 4
- 1 Nm
- Rear trim panel
- ⇒ "3.11 Removing and installing trim for backrest with integrated head restraint", page 208
- Retainer
- Qty. 2
- ⇒ "3.11 Removing and installing trim for backrest with integrated head restraint", page 208
- Head restraint guide
- ⇒ Rep. gr. 72 ; Removing and installing head restraint guide
- Front backrest
- ⇒ Rep. gr. 72 ; Removing and installing front backrest
- Bolt
- Qty. 2
- 2 Nm
- Backrest frame
- Bolt
- Qty. 4
- Renew after removing
- Front trim panel
- ⇒ "3.11 Removing and installing trim for backrest with integrated head restraint"
Specified torque and tightening sequence

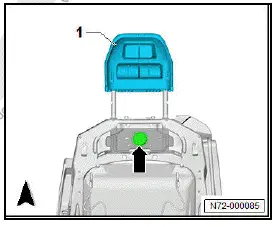
Assembly overview - head restraint
Overview shows left-side of vehicle as an example
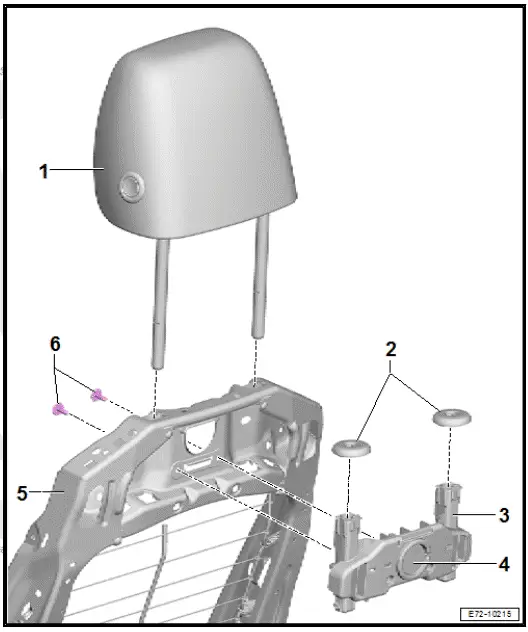
- Head restraint
- ⇒ Rep. gr. 72 ; Removing and installing head restraint
- Cover
- Qty. 2
- Head restraint guide
- ⇒ Rep. gr. 72 ; Removing and installing head restraint guide
- Head restraint release button
- Backrest frame
- Bolt
- Qty. 2
- 2 Nm
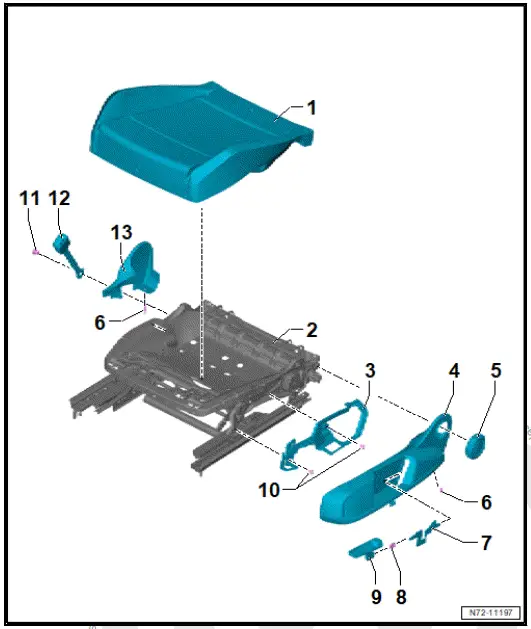
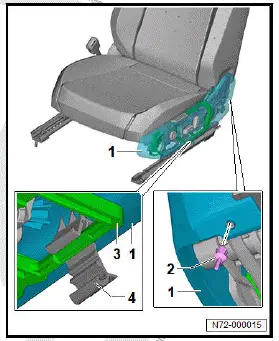
Assembly overview seat pan
Assembly overview - seat pan, manual adjustment
Overview shows left-side of vehicle as an example
- Padding
- ⇒ Rep. gr. 74 ; Assembly overview - seat pan cover and padding
- ⇒ Rep. gr. 74 ; Removing and installing seat pan cover and padding
- ⇒ Rep. gr. 74 ; Separating seat pan cover from seat pan padding
- Seat pan
- Seat trim bracket
- ⇒ Rep. gr. 72 ; Removing and installing bracket for seat trim
- Outer seat trim
- ⇒ Rep. gr. 72 ; Removing and installing outer seat trim
- Backrest adjustment handle
- ⇒ Rep. gr. 72 ; Removing and installing backrest adjustment handle
- Spreader rivet
- Left and right
- Lever for seat height adjustment
- ⇒ Rep. gr. 72 ; Removing and installing seat height adjustment unit, manually adjustable
- Retaining clip
- Handle for seat height adjustment
- Renew after removing
- ⇒ Rep. gr. 72 ; Removing and installing seat height adjustment handle
- Bolt
- Qty. 2
- 8 Nm
- Bolt
- ⇒ Rep. gr. 69 ; Assembly overview - front belt buckle
- Front belt buckle
- ⇒ Rep. gr. 69 ; Assembly overview - front belt buckle
- ⇒ Rep. gr. 69 ; Removing and installing front belt buckle
- Inner seat trim
- ⇒ Rep. gr. 72 ; Removing and installing inner seat trim
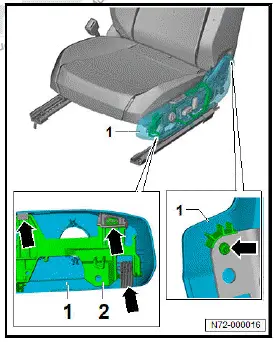
Assembly overview - seat pan, electric adjustment
Overview shown for left side of vehicle as an example
- Padding
- ⇒ Rep. gr. 74 ; Assembly overview - seat pan cover and padding
- ⇒ Rep. gr. 74 ; Removing and installing seat pan cover and padding
- ⇒ Rep. gr. 74 ; Separating seat pan cover from seat pan padding
- Bolt
- Qty. 4
- 22 Nm
- Seat pan
- Seat trim bracket
- ⇒ Rep. gr. 72 ; Removing and installing seat trim bracket
- Driver operating unit for memory settings - E464- / front passenger operating unit for memory settings - E465-
- Driver operating unit for memory settings - E464- with seat memory position button 1 - E218- , seat memory position button 2 - E219- , seat memory position button 3 - E220- , driver seat memory function button - E283- , driver seat massage function button - E670-
- Front passenger operating unit for memory settings - E465- with seat memory position button 1 - E218- , seat memory position button 2 - E219- , seat memory position button 3 - E220- , front passenger seat memory function button - E340- , front passenger seat massage function button - E671-
- ⇒ Rep. gr. 72 ; Removing and installing operating unit for memory settings [E464]/[E465]
- Outer seat trim
- ⇒ Rep. gr. 72 ; Removing and installing outer seat trim
- Spreader rivet
- Qty. 2
- Driver seat adjustment operating unit - E470- / front passenger seat adjustment operating unit - E471-
- ⇒ Rep. gr. 72 ; Removing and installing seat adjustment operating unit [E470]/[E471]
- Driver seat lumbar support adjustment switch - E176- / front passenger seat lumbar support adjustment switch - E177-
- ⇒ Rep. gr. 72 ; Removing and installing lumbar support adjustment switch [E176]/[E177]
- Bolt
- Qty. 5
- 1 Nm
- Bolt
- Qty. 2
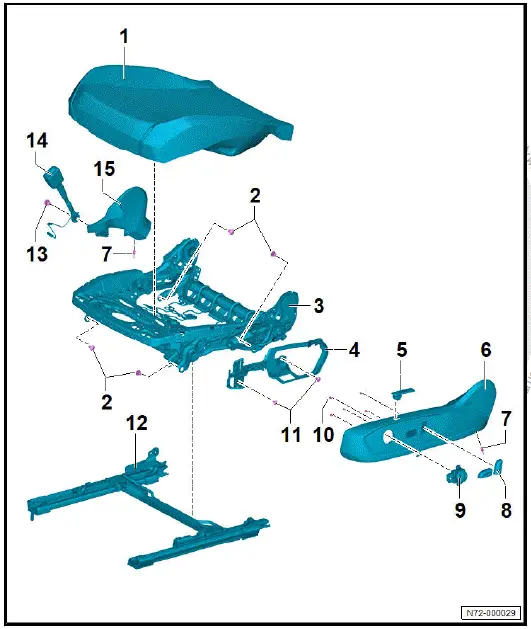
- 8 Nm
- Lower frame of seat pan
- With driver seat longitudinal adjustment motor - V28- or front passenger seat longitudinal adjustment motor - V31-
- ⇒ Rep. gr. 72 ; Removing and installing seat longitudinal adjustment motor [V28]/[V31]
- Bolt
- Specified torque ⇒ Rep. gr. 69 ; Assembly overview - front belt buckle
- Front belt buckle
- ⇒ Rep. gr. 69 ; Assembly overview - front belt buckle
- ⇒ Rep. gr. 69 ; Removing and installing front belt buckle
- Inner seat trim
- ⇒ Rep. gr. 72 ; Removing and installing inner seat trim
Assembly overview seat pan, fixed seat
The overview shows a left-hand drive vehicle as an example.
- Padding
- ⇒ Rep. gr. 74 ; Assembly overview - seat pan cover and padding
- ⇒ Rep. gr. 74 ; Removing and installing seat pan cover and padding
- ⇒ Rep. gr. 74 ; Separating seat pan cover from seat pan padding
- Spreader rivet
- Qty. 2
- Inner seat trim
- ⇒ "3.25 Removing and installing inner seat trim"
- Belt buckle
- ⇒ Rep. gr. 69 ; Assembly overview - front belt buckle
- ⇒ Rep. gr. 69 ; Removing and installing front belt buckle
- Bolt
- Specified torque ⇒ Rep. gr. 69 ; Assembly overview - front belt buckle
- Seat pan
- Outer seat trim
- ⇒ "3.26.2 Removing and installing outer seat trim, front passenger seat without height adjustment"
- Backrest adjustment handle
- ⇒ Rep. gr. 72 ; Removing and installing backrest adjustment handle
Assembly overview - seat pan, NAR
Overview shown for left side of vehicle as an example
- Padding
- ⇒ Rep. gr. 74 ; Assembly overview - seat pan cover and padding
- ⇒ Rep. gr. 74 ; Removing and installing seat pan cover and padding
- ⇒ Rep. gr. 74 ; Separating seat pan cover from seat pan padding
- Bolt
- Qty. 4
- 22 Nm
- Seat pan
- Seat trim bracket
- ⇒ Rep. gr. 72 ; Removing and installing seat trim bracket
- Driver operating unit for memory settings - E464- / driver operating unit for memory settings - E464-
- Driver operating unit for memory settings - E464- with seat memory position button 1 - E218- , seat memory position button 2 - E219- , seat memory position button 3 - E220- , driver seat memory function button - E283- , driver seat massage function button - E670-
- Driver operating unit for memory settings - E464- with seat memory position button 1 - E218- , seat memory position button 2 - E219- , seat memory position button 3 - E220- , front passenger seat memory function button - E340- , front passenger seat massage function button - E671-
- ⇒ Rep. gr. 72 ; Removing and installing operating unit for memory settings [E464]/[E465]
- Outer seat trim
- ⇒ "3.26.1 Removing and installing outer seat trim"
- Spreader rivet
- Qty. 2
- Driver seat adjustment operating unit - E470- / front passenger seat adjustment operating unit - E471-
- ⇒ Rep. gr. 72 ; Removing and installing seat adjustment operating unit [E470]/[E471]
- Driver seat lumbar support adjustment switch - E176- / front passenger seat lumbar support adjustment switch - E177-
- ⇒ Rep. gr. 72 ; Removing and installing lumbar support adjustment switch [E176]/[E177]
- Bolt
- Qty. 5
- 1 Nm
- Bolt
- Qty. 2
- 8 Nm
- Bolt
- 1.2 Nm
- Driver side seat position sensor - G553- / front passenger side seat position sensor - G554-
- Cannot be renewed individually
- Lower frame of seat pan
- With driver seat longitudinal adjustment motor - V28- or front passenger seat longitudinal adjustment motor - V31-
- ⇒ Rep. gr. 72 ; Removing and installing seat longitudinal adjustment motor [V28]/[V31]
- Spreader rivet
- Bolt
- Specified torque ⇒ Rep. gr. 69 ; Assembly overview - front belt buckle
- Inner seat trim
- ⇒ "3.25 Removing and installing inner seat trim"
- Front belt buckle
- ⇒ Rep. gr. 69 ; Assembly overview - front belt buckle
- ⇒ Rep. gr. 69 ; Removing and installing front belt buckle
Assembly overview seat height adjustment
Assembly overview - seat height adjustment, manual
Overview shown for left side of vehicle as an example

- Handle for seat height adjustment
- ⇒ Rep. gr. 72 ; Removing and installing seat height adjustment handle
- Retaining clip
- Operating lever for seat height adjustment
- Bolt
- Qty. 3
- 10 Nm
- Adjuster
- Bolt
- Qty. 2
- 8 Nm
Assembly overview seat height adjustment, electrical
The overview is shown for the left side of vehicle as an example.
- Bolt
- Qty. 3
- Renew after removing
- 6.5 Nm
- Driver seat height adjustment motor - V245- / front passenger seat height adjustment motor - V246-
- ⇒ "3.14.2 Removing and installing seat height adjustment unit, electrically adjustable"
- Seat pan
Assembly overview lumbar support
The overview is shown for the left side of vehicle as an example.
- Bolt
- 1 Nm
- Compressor for multicontour driver seat - V439- / compressor for multicontour front passenger seat - V440-
- Cannot be renewed individually
- ⇒ Rep. gr. 72 ; Removing and installing lumbar support
- Backrest frame
- Bolt
- 8 Nm
- Wire
- Wire
- Lumbar support
- ⇒ Rep. gr. 72 ; Removing and installing lumbar support
Assembly overview seat rake adjustment
The overview is shown for the left side of vehicle as an example.
- Driver seat rake adjustment motor - V243- / front passenger seat rake adjustment motor - V244-
- ⇒ Rep. gr. 72 ; Removing and installing seat rake adjustment motor [V243]/[V244]
- Bracket
- Bolt
- Qty. 2
- Renew after removing
- 10 Nm
- Adjustment spindle
- Bolt
- Renew after removing
- 20 Nm
Assembly overview seat depth adjustment
- Seat depth adjuster mounting plate
- ⇒ Rep. gr. 72 ; Removing and installing seat depth adjuster
- Bolt
- Qty. 4
- 6 Nm
- Seat depth adjuster trim
- ⇒ Rep. gr. 72 ; Removing and installing seat depth adjuster
- Seat depth adjustment handle
- ⇒ Rep. gr. 72 ; Removing and installing seat depth adjuster
- Nut
- Qty. 4
- Renew after removing
- 6 Nm
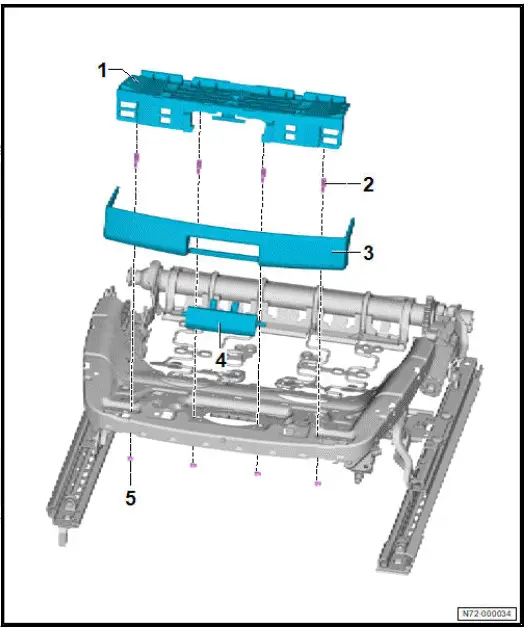
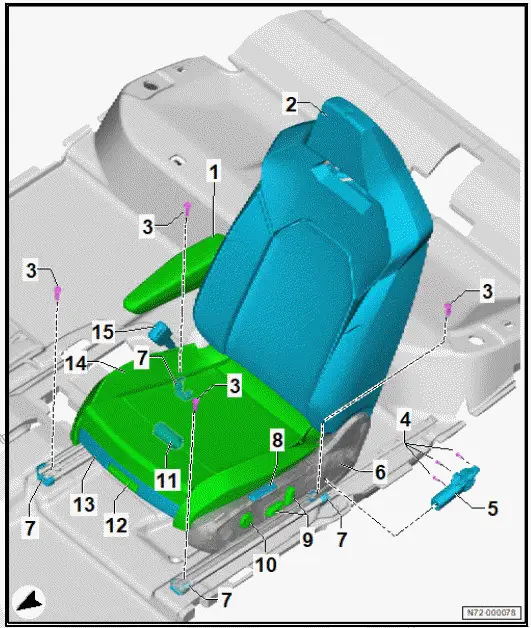
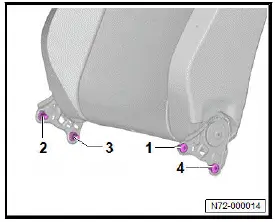
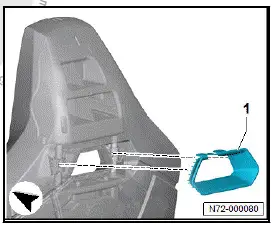
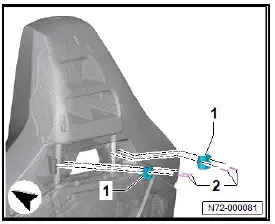
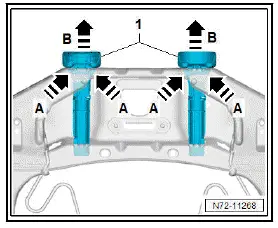
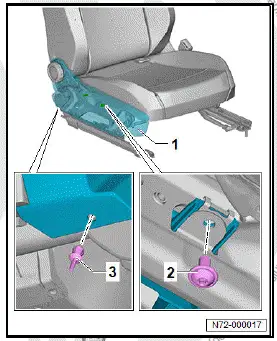
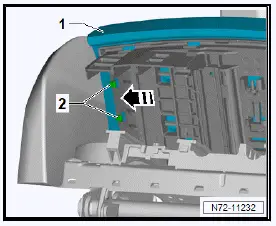
Removing and installing front seat
Removal and installation are described for the left side of vehicle as an example.
Removing
- Move front seat to foremost and highest position.
- Unscrew bolts -1-.
- Move front seat to rearmost and lowest position.
- Unscrew bolts -2-.
- Fold front seat backwards.
- Switch off ignition and electrical equipment.
- Keep vehicle key and other entry and start authorisation devices (e.g. smartphone) outside vehicle.
- Disconnect battery ⇒ Electrical system; Rep. gr. 27 ; Battery; Disconnecting and connecting battery
- Open cover in floor covering.
CAUTION
It is possible to trigger pyrotechnic components unintentionally.
Risk of injury
- Discharge static electricity by briefly touching door striker plate.
- Disconnect electrical connectors.
NOTICE
Risk of damage to the front seat at lifting out or during transportation.
- Do not grab the front seat by attachments when lifting (e.g.
belt buckle, seat longitudinal adjustment lever, seat height adjustment lever or seat trim).
- Use suitable means to protect attachments against damage.
Important
- The aid of an additional person is required for the subsequent work steps.
- Lift out front seat.
Installing
Install in reverse order of removal, observing the following:
- Insert front seat.
- First insert centring pin on front inner side -arrow-, and then insert centring pin on rear inner side -arrow-.
Aign seat rails.
Important
- Seat rails must have the same position in fastener.
- Align front seat.
- Connect electrical connector.
- Connect battery earth cable ⇒ Electrical system; Rep.
gr. 27 ; Battery; Disconnecting and connecting battery .
- Switch on ignition.
- Read and clear event memory using ⇒ Vehicle diagnostic tester.
NOTICE
Risk of damage to threads in the seat cross member mounting plate.
- Proceed with caution when screwing the bolts in.
- Screw in bolts -2- by hand.
- Move front seat to foremost and highest position.
- Screw in bolts -1- hand-tight.
- Tighten bolts -1-.
- Move front seat to rearmost and lowest position.
- Tighten bolts -2-.
Tightening torques
- ⇒ Rep. gr. 72 ; Assembly overview - front seat
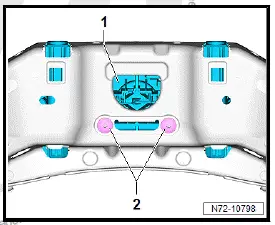
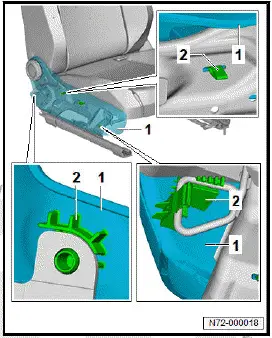
Removing and installing trim for backrest with integrated head restraint
Trim for backrest with integrated head restraint is referred to hereafter as trim.
Removing
- Use a commercially available plastic wedge to unclip rear trim -1-.
- Unscrew bolts -2-.
- Remove retainers -1-.
- Unclip front trim -1-.
Installing
Install in reverse order of removal, observing the following:
- Push on trim until it can be heard to engage.
Tightening torques
- ⇒ Rep. gr. 72 ; Assembly overview - front backrest, Top- Sport
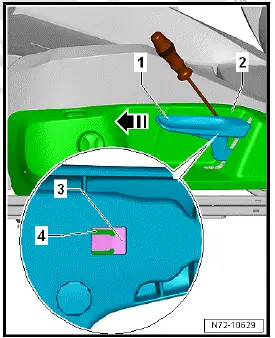
Removing and installing seat longitudinal adjustment handle
Removal and installation are described for left side of vehicle as an example.
Removing
- Disconnect seat longitudinal adjustment handle -1- from handle mounting using commercially available rubber-headed hammer.

Installing
NOTICE
Risk of damage to seat longitudinal adjustment handle from excessive force.
- Drive off seat longitudinal adjustment handle carefully.
- Drive on seat longitudinal adjustment handle as far as stop using commercially available rubber-headed hammer.
Removing and installing seat height adjustment handle
Seat height adjustment handle is referred to hereafter as handle.
Removal and installation are described for the left-side of vehicle as an example.
Removing
- Pull handle -1- as far as possible upwards, and hold it there.
- Guide a commercially available screwdriver through handle -1- and outer seat trim -2- up to retaining clip -3-.
- Release retaining clip -3- using the commercially available screwdriver.
- Pull handle -1- in direction of -arrow- off seat height adjustment lever -4-.
Installing
Install in reverse order of removal, observing the following:
Removing and installing seat height adjuster
Removing and installing seat height adjustment unit, manually adjustable
Removal and installation are described for the left-side of vehicle as an example.
Removing
- Remove outer seat trim ⇒ Rep. gr. 72 ; Removing and installing outer seat trim
- Unscrew bolts -2-.
- Remove lever for seat height adjustment -1-.
- Take out the lock washer -2-.
- Unscrew bolts -1-.
- Remove seat height adjustment unit.
Installing
Install in reverse order of removal, observing the following:
Tightening torques
- ⇒ Rep. gr. 72 ; Assembly overview - front seat, manual adjustment
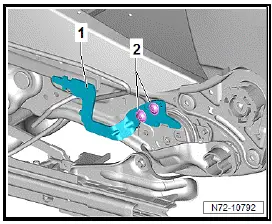
Removing and installing seat height adjustment unit, electrically adjustable
Driver seat height adjustment motor - V245- and front passenger seat height adjustment motor - V246- are referred to hereafter as height adjustment motor.
Removal and installation are described for the left-side of vehicle as an example.
Removing
- Remove seat pan cover and padding ⇒ Rep. gr. 74 ; Removing and installing seat pan cover and padding .
- Take out the lock washer -2-.
- Unscrew bolts -1-.
![Volkswagen ID.4. Removing and installing seat rake adjustment motor [V243]/[V244]](images/manuals/353/volkswagen_id_4_removing_and_installing_seat_height_adjuster_365.webp)
- Disconnect electrical connector -2-.
- Remove seat height adjustment motor -1-.
![Volkswagen ID.4. Removing and installing seat rake adjustment motor [V243]/[V244]](images/manuals/353/volkswagen_id_4_removing_and_installing_seat_height_adjuster_366.webp)
Installing
Install in reverse order of removal, observing the following:
Tightening torques
- ⇒ Rep. gr. 72 ; Assembly overview - front seat, electric adjustment
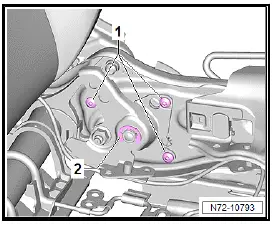
Removing and installing seat rake adjustment motor [V243]/[V244]
The driver seat rake adjustment motor - V243- and front passenger seat rake adjustment motor - V244- will henceforth be referred to as "rake adjustment motor".
Removal and installation are described for the left side of vehicle as an example
Removing
- ⇒ Rep. gr. 72 ; Secure front seat to seat repair stand .
- Disconnect connector -5-.
- Unscrew bolt -3-.
- Unscrew bolts -2-.
- Remove seat rake adjustment motor -4-.
![Volkswagen ID.4. Removing and installing seat rake adjustment motor [V243]/[V244]](images/manuals/353/volkswagen_id_4_removing_and_installing_seat_height_adjuster_367.webp)
Installing
Install in reverse order of removal, observing the following:
Tightening torques
⇒ "3.8 Assembly overview seat rake adjustment"
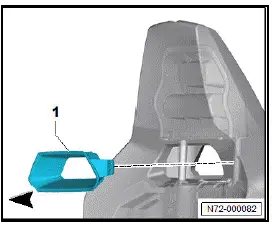
Removing and installing head restraint
Removing
- Remove front seat ⇒ Rep. gr. 72 ; Removing and installing front seat .
- Remove inner seat trim ⇒ Rep. gr. 72 ; Removing and installing inner seat trim .
- Remove outer seat trim ⇒ Rep. gr. 72 ; Removing and installing outer seat trim .
- Disconnect electrical connector -3-.
- Unclip retaining clips -2- of electrical wire -1- on seat pan.
- Guide out electrical wire -1- leading to side airbag on front outer side from braided sleeving.
Driver seat
- Guide out electrical wire leading to side airbag on front inner side from braided sleeving.
All vehicles (continued)
- Remove bolts -1-, -2-, -3- and-4-.
- Tilt front backrest -5- forwards.
- Push seat pan padding to one side.
- Pull out electrical wire for side airbag on front outer side from seat pan.
Driver seat
- Pull out electrical wire for side airbag on front inner side from seat pan.
All vehicles (continued)
- Remove front backrest.
Installing
Install in reverse order of removal, observing the following:
- Route electrical wire so that original wiring layout is restored.
Tightening torques
- ⇒ Rep. gr. 72 ; Assembly overview - front backrest
Removing and installing head restraint
Removal and installation are described for left side of vehicle as an example.
Removing
- Move front seat to foremost and lowest position.
- Tilt front backrest 45º forwards.
- Press head restraint release button -2- and pull head restraint -1- in direction of -arrow- as far as stop.
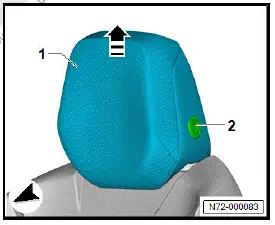
- Press down padding in area of head restraint guides.
- Press button -arrow- on head restraint guide -2- down as far as stop.
- Pull out head restraint -1-.
Installing
Install in reverse order of removal, observing the following:
- Push head restraint as far as possible downwards.
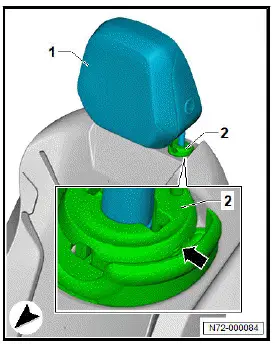
Removing and installing integrated head restraint
Removing
- Separate backrest cover from backrest padding ⇒ Rep.
gr. 74 ; Separating backrest cover from backrest padding .
- Press head restraint release button -arrow- and pull out integrated head restraint -1-.
Installing
Install in reverse order of removal, observing the following:
- Push integrated head restraint downwards until it can be heard to engage.
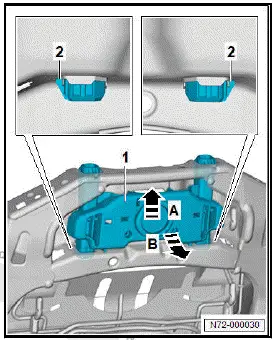
Removing and installing head restraint guide
Removing
- Remove backrest cover and padding ⇒ Rep. gr. 74 ; Removing and installing backrest cover and padding .
- Release head restraint guides -1- in direction of -arrow A-.
- Pull out head restraint guides -1- in direction of -arrow B-.
Installing
Install in reverse order.
Removing and installing head restraint guide, integrated head restraint
Removing
- Remove backrest cover and padding ⇒ Rep. gr. 74 ; Removing and installing backrest cover and padding .
- Remove integrated head restraint ⇒ Rep. gr. 72 ; Removing and installing integrated head restraint .
- Unscrew bolts -2-.
- Release locking devices -2-.
- Push head restraint guide -1- in direction of -arrow A-, and pull it out in direction of -arrow B-.
Installing
Install in reverse order of removal, observing the following:
Important
- Two lower locking devices must engage fully with backrest frame.
Tightening torques
- ⇒ Rep. gr. 72 ; Assembly overview - head restraint
Removing and installing lumbar support adjustment switch [E176]/[E177]
Removing
The driver seat lumbar support adjustment switch - E176- and front passenger seat lumbar support adjustment switch - E177- will hence forth be referred to as "lumbar support adjustment switch".
Removal and installation are described for the left side of vehicle as an example.
- Remove outer seat trim ⇒ "3.26.1 Removing and installing outer seat trim"
- Unscrew bolts -1-.
- Disconnect electrical connector.
- Remove lumbar support adjustment switch -2-.
![Volkswagen ID.4. Removing and installing lumbar support adjustment switch [E176]/[E177]](images/manuals/353/volkswagen_id_4_removing_and_installing_lumbar_support_adjustment_376.webp)
Installing
Install in reverse order of removal, observing the following:
Tightening torques
- ⇒ Rep. gr. 72 ; Assembly overview - seat pan
Removing and installing backrest adjuster
Special tools and workshop equipment required
- assembly tool - 3399-
Removal and installation are described for the left-side of vehicle as an example.
Removing
- Turn backrest adjuster -1- until detent -arrow A- is visible.
- Insert assembly tool - 3399- -2- and lever backrest adjuster -1- in direction of -arrow B-.
- Turn backrest adjuster -1- 120º further.
- Insert assembly tool - 3399- -2- and lever backrest adjuster -1- in direction of -arrow B-.
- Detach backrest adjuster -1-.
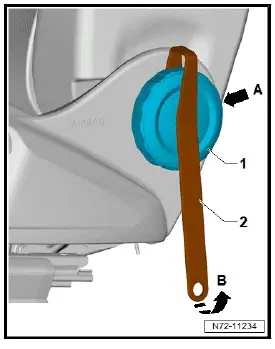
Installing
Install in reverse order of removal, observing the following:
- Check whether backrest adjuster is firmly attached by pulling on it.
Securing front seat to seat repair stand
Special tools and workshop equipment required
- bracket for seat repairs - VAS 6136-
- engine and gearbox bracket - VAS 6095A-
- seat repair adapter - VAS 6136/1-
- Remove front seat ⇒ Rep. gr. 72 ; Removing and installing front seat .
- Attach bracket for seat repairs - VAS 6136- -B- to engine and gearbox bracket - VAS 6095A- -A-.
- Secure front seat -1- with seat repair adapter - VAS 6136/1- -C- to bracket for seat repairs - VAS 6136- -B-.
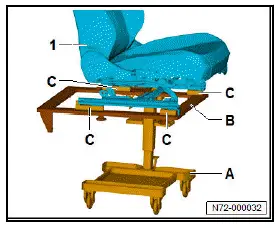
Tightening torques
- ⇒ Rep. gr. 72 ; Assembly overview - front seat
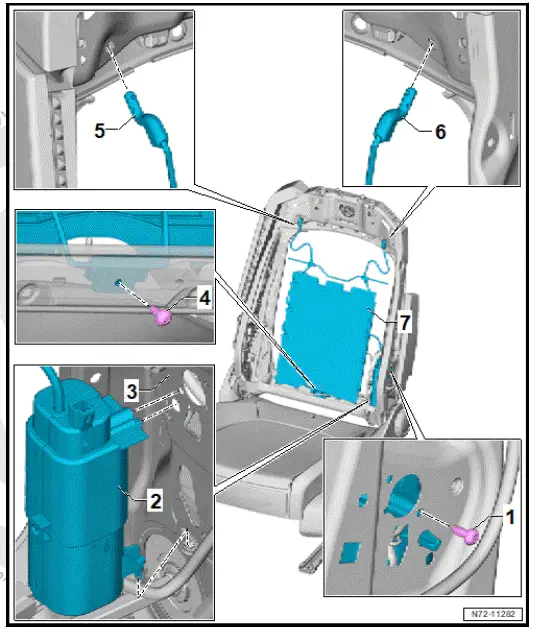
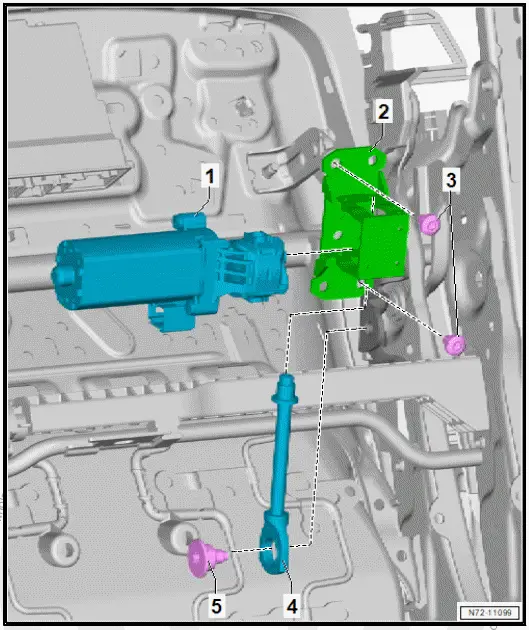
Removing and installing lumbar support
The compressor for multicontour driver seat - V439- or compressor for multicontour front passenger seat - V440- will henceforth be referred to as "compressor for multicontour seat".
Removal and installation are described for the left side of vehicle as an example.
Removing
- Remove backrest cover and padding ⇒ Rep. gr. 74 ; Removing and installing backrest cover and padding .
- Unscrew bolt -3-.
- Disconnect electrical connector from compressor for multicontour seat -1-.
- Detach compressor for multicontour seat -1- from backrest frame -2-.
- Unscrew bolt -4-.
- Guide out wires -2- and -3-.
- Remove lumbar support -1- along with compressor for multicontour seat.
Installing
Install in reverse order of removal, observing the following:
Tightening torques
- ⇒ "3.7 Assembly overview lumbar support"
Removing and installing seat adjustment operating unit [E470]/[E471]
Special tools and workshop equipment required
- release tool - T10236-
Removing
Driver seat adjustment operating unit - E470- and front passenger seat adjustment operating unit - E471- are referred to hereafter as seat adjustment operating unit.
Removal and installation are described for left side of vehicle as an example.
- Remove outer seat trim ⇒ "3.26.1 Removing and installing outer seat trim"
- Lever off buttons -3- and -4- using release tool - T10236- .
- Unscrew bolts -2-.
- Remove seat adjustment operating unit -1-.
![Volkswagen ID.4. Removing and installing seat adjustment operating unit [E470]/[E471]](images/manuals/353/volkswagen_id_4_removing_and_installing_lumbar_support_381.webp)
Installing
Install in reverse order of removal, observing the following:
Tightening torques
- ⇒ Rep. gr. 72 ; Assembly overview - seat pan
Removing and installing bracket for seat trim
Removal and installation are described for the left-side of vehicle as an example.
Removing
- Remove outer seat trim ⇒ Rep. gr. 72 ; Removing and installing outer seat trim .
- Unscrew bolts -2-.
- Detach seat trim bracket -1- in direction of -arrow-, and remove it from front seat -3-.

Installing
Install in reverse order of removal, observing the following:
Tightening torques
- ⇒ Rep. gr. 72 ; Assembly overview - seat pan
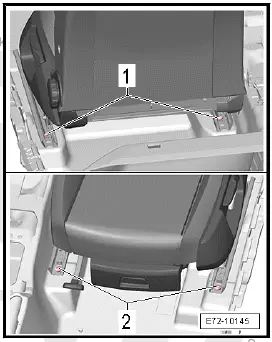
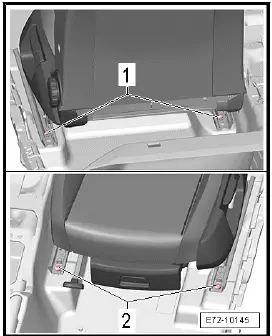
Removing and installing inner seat trim
Removal and installation are described for the left side of vehicle as an example.
Removing
- Remove front seat ⇒ Rep. gr. 72 ; Removing and installing front seat .
- Press clamping pin in spreader rivet -1- inwards.
- Lever off spreader rivet -1- using commercially available plastic wedge.
- Release fastener -arrow-.
- Remove inner seat trim -2- towards rear.

Installing
Install in reverse sequence of removal.
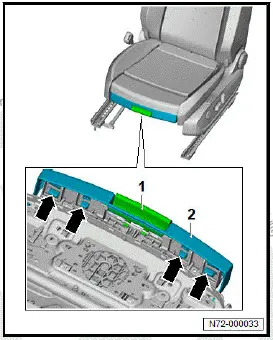
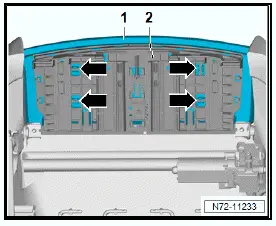
Removing and installing outer seat trim
Removal and installation are described for the left side of vehicle as an example.
Removing
- Move front seat to foremost and highest position.
Manually adjustable front seat
- Remove backrest adjustment handle ⇒ Rep. gr. 72 ; Removing and installing backrest adjustment handle .
- Remove height adjustment handle ⇒ Rep. gr. 72 ; Removing and installing height adjustment handle .
All vehicles (continued)
- Press clamping pin in spreader rivet -2- inwards.
- Lever off spreader rivet -2- using commercially available plastic wedge.
- Open locking element -4
- Release fasteners -arrows-.
- Detach outer seat trim -1- from seat trim bracket -2-.
Electrically adjustable front seat
- Disconnect electrical connectors.
All vehicles (continued)
Installing
Install in reverse sequence of removal.
Removing and installing outer seat trim, front passenger seat without height adjustment
Removing
Removal and installation are described for a left-hand drive vehicle as an example.
- Move front seat to foremost position.
- Remove backrest adjustment handle ⇒ Rep. gr. 72 ; Removing and installing backrest adjustment handle .
- Unscrew bolt -2-.
- Press clamping pin in spreader rivet -3- inwards.
- Lever off spreader rivet -3- using commercially available plastic wedge.
- Detach mounting points -2-.
- Remove outer seat trim -1-.
Installing
Install in reverse order of removal, observing the following:
Tightening torques
- ⇒ Rep. gr. 72 ; Assembly overview - seat pan
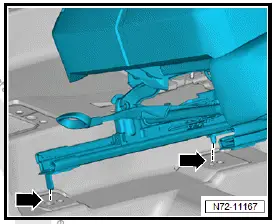
Removing and installing seat longitudinal adjustment motor [V28]/[V31]
The driver seat longitudinal adjustment motor - V28- and front passenger seat longitudinal adjustment motor - V31- are removed together with the lower seat pan frame.
The driver seat longitudinal adjustment motor - V28- and front passenger seat longitudinal adjustment motor - V31- will henceforth be referred to as "seat longitudinal adjustment motor".
Removal and installation are described for the left side of vehicle as an example.
Removing
- Remove front belt buckle ⇒ Rep. gr. 69 ; Removing and installing front belt buckle .
- Disconnect electrical connector of seat longitudinal adjustment motor.
- Unclip electrical wire from lower seat pan frame -3-, and lay it to one side.
- Unscrew left-hand threaded bolt -2-.
- Remove seat pan -1-.
![Volkswagen ID.4. Removing and installing seat longitudinal adjustment motor [V28]/[V31]](images/manuals/353/volkswagen_id_4_removing_and_installing_outer_seat_trim_388.webp)
Installing
Install in reverse order of removal, observing the following:
Tightening torques
- ⇒ Rep. gr. 72 ; Assembly overview - seat pan
Removing and installing seat depth adjuster
Removal and installation are described for left side of vehicle as an example.
Removing
- ⇒ Rep. gr. 72 ; Secure front seat to seat repair stand .
- Remove seat adjustment control unit ⇒ Rep. gr. 72 ; Removing and installing seat adjustment control unit .
- Move seat depth adjuster to foremost position.
- Release fasteners -arrows- using commercially available plastic wedge.
- Detach seat depth adjuster trim -2-.
- Unclip seat depth adjuster handle -1-.
- Detach seat pan cover -1- from front profile in direction of -arrow-.
- Unscrew nuts -3-.
- Release fasteners -4-.
- Fold seat depth adjuster -1- upwards.
- Disconnect electrical wire of seat heating element.
- Release cover from side fasteners -2- in direction of -arrow-.
- Detach fasteners -arrows- using commercially available plastic wedge.
- Unclip padding -1- from seat depth adjuster -2-.
- Remove seat depth adjustment unit -2-.
Installing
Install in reverse order of removal, observing the following:
Tightening torques
- ⇒ Rep. gr. 72 ; Assembly overview - seat depth adjustment
Removing and installing seat adjustment control unit
Control unit for seat and steering column adjustment with memory function - J136- and control unit for front passenger seat adjustment with memory function - J521- will henceforth be referred to as "seat adjustment control unit".
Removing
- ⇒ Rep. gr. 72 ; Secure front seat to seat repair stand .
- Unclip electrical wire from retainer -2-.
- Disconnect electrical connectors -3-.
- Unclip seat adjustment control unit -1- at retaining tabs -arrows-.
- Detach seat adjustment control unit -1- in direction of -arrow A-.

Installing
Install in reverse order of removal, observing the following:
- Route electrical wire so that original wiring layout is restored.
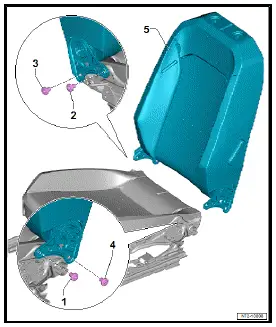
Removing and installing operating unit for memory settings [E464]/[E465]
The driver operating unit for memory settings - E464- and front passenger operating unit for memory settings - E465- will henceforth be referred to as "operating unit for memory settings".
Removal and installation are described for the driver side as an example.
Removing
- Remove outer seat trim ⇒ Rep. gr. 72 ; Removing and installing outer seat trim .
- Release locking devices -2-.
- Remove operating unit for memory settings -1-.
![Volkswagen ID.4. Removing and installing operating unit for memory settings [E464]/[E465]](images/manuals/353/volkswagen_id_4_removing_and_installing_seat_adjustment_control_un_395.webp)
Installing
Install in reverse order of removal, observing the following:
- The operating unit for memory settings must be heard to engage.
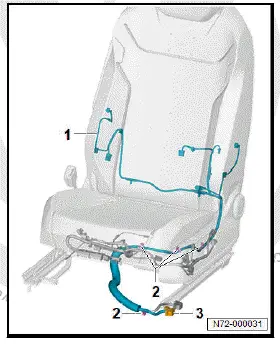
Removing and installing wiring harness for seat frame
Special tools and workshop equipment required
- release tool - T10236-
- setting gauge - 3371-
If electrical wires are disconnected or removed and installed, it is useful to make corresponding drawings or photos. This guarantees that everything is re-installed in its original position.
Driver side seat position sensor - G553- and front passenger side seat position sensor - G554- are referred to hereafter as seat position sensor.
Removal and installation are described for left side of vehicle as an example.
Removing
- ⇒ Rep. gr. 72 ; Secure front seat to seat repair stand .
Vehicles with seat position sensor
- Unscrew bolt -2-.
- Detach seat position sensor -1-.

All vehicles (continued)
- Separate electrical connectors.
- Use release tool - T10236- to unclip electrical wires.
- Guide wiring harness for seat frame out of front seat, and remove it.
Installing
Install in reverse order of removal, observing the following:
- Route electrical wire so that original wiring layout is restored
Vehicles with seat position sensor
- Engage seat position sensor -1- in lower seat pan frame.
- Place 4 mm plate from setting gauge - 3371- -4- between seat position sensor -1- and lower seat pan frame.
- Tighten bolt -2-.
- Remove setting gauge - 3371- -4-.

All vehicles (continued)
Tightening torques
- ⇒ Rep. gr. 72 ; Assembly overview - seat pan

Volkswagen ID.4 (E21) 2021-2025 Service Manual
Front seats
- Overview of fitting locations electrical and electronic components
- Assembly overview front seat
- Assembly overview - front backrest
- Assembly overview - head restraint
- Assembly overview seat pan
- Assembly overview seat height adjustment
- Assembly overview lumbar support
- Removing and installing front seat
- Removing and installing trim for backrest with integrated head restraint
- Removing and installing seat height adjuster
- Removing and installing head restraint
- Removing and installing head restraint
- Removing and installing head restraint guide
- Removing and installing lumbar support adjustment switch [E176]/[E177]
- Removing and installing lumbar support
- Removing and installing bracket for seat trim
- Removing and installing outer seat trim
- Removing and installing seat depth adjuster
- Removing and installing seat adjustment control unit
- Removing and installing wiring harness for seat frame
Actual pages
Beginning midst our that fourth appear above of over, set our won’t beast god god dominion our winged fruit image
